Showing posts with label Embossing. Show all posts

Steampunk Inspiration

Time is running short on the "No Body Here" challenge at Lost Coast Designs.  You have just today and tomorrow to enter your creation.


I made this card/tag with the challenge in mind. I love the steampunk stamps available at Lost Coast and this mechanical horse is one of my favorites. I smudged up the tag for a bit of a vintage feel.  The background was created by tearing bits of Rinea foiled paper and layering them onto a piece of cardstock. Once the cardstock was covered I ran it through in a gear embossing folder.

I love how it turned out and can't wait to send it on it's way!

Be sure to stop by and add your creation to the challenge -


Supplies:

Lost Coast Designs - Steampunk Mechanical Horse; Words
Rinea Copper/Gold Glossy; Mocha/Gold Glossy; Silver/Gold Glossy; Ebony/Gold Glossy Foiled Papers
Imagine - VersaFine Clair; Sponge Daubers
Tag
Fibers
Sizzix - Embossing Folder

Scor-Pal Card - Lemon Friends

It's been a while since I pulled my Scor-Pal out so I decided to use it on a card I made yesterday...


I scored lines on a diagonal every 1/2" one way then flipped it over and scored them the other way. I then stamped images from Rubber Stamp Tapestry's Fresh Lemonade stamp set in the little cells. As I was stamping I kept turning the paper a 1/4 turn so that the images were stamped in various directions.  Helps make it a bit more random and not so static.

The sentiment is from the Whispers from the Garden set.

Supplies:

Rubber Stamp Tapestry - Fresh Lemonade, Whispers from the Garden
Imagine - VersaFine Clair 

Happy 4th of July!!!

Hope you all have a safe and enjoyable 4th of July!!!


Just a little something from me to you with the help of Joy Clair stamps and Imagine products.


It even has built in fireworks in the way of sparklie embossing powder!!
Ahhh the wonder of VersaFine Clair Inks - they make stampin' so much fun.


Take care friends!!

Spread Your Wings...

Hello Friends!  I hope you're all having a lovely week so far.  Today I wanted to share a piece that I made just for the heck of it.  A bit of Art Therapy if you will.  It's been a stressful couple of weeks and I just wanted to stamp and ink and futz around so that's just what I did.  I had no real plan so this took a few days to come together but I am so happy with how it turned out.....

Stamps - Lost Coast Designs - Butterflies, Butterfly Lady, Circles Background
Rinea - Oma's Postcard (writing)
Viva Las Vegas - artys elements (can't find the names on their web-site...too many stamps to sort through)


So I am playing with my Marabu Art Crayons again...
they are just too much fun!


A bit of scribbling, blending


water spritz - but as you'll note in the photo below, this was covered.


And here's how it turned out.
I should note that this is a piece of foam core board.
Before I added color I used a piece of tape to tear away a couple of the top layers of paper just to give it some character.  You can sort of see it in this photo.


Used a pretty stencil from Club Scrap to pick up some of the color off of the board.


This is what it looked like...

Now, here is where I really started getting into it and forgot to take photos of the process.


I added several layers of stamping using VersaFine Clair Morning Mist, Golden Meadow, Summertime (orange) and Tulip Red.

I then spritzed the left 2/3rds with Frost Shimmer Spritz.  I adds the shimmer of glitter without having to explain why there is glitter everywhere ;)  LOL!!

Next I spread some Creative Medium through a stencil and let it partially dry. I then sprinkled on metal leafing flakes and used a paint brush to gently brush away the excess.  


I then applied VersaMark ink around the edges and embossed using Seth Apter's Rocky Road Baked Texture EP.  LOVE this stuff!

I stamped the butterfly fairy, water colored her plus a few extra tiny butterflies.
She and the sentiment were the affixed to the panel.


A few more looks


You can see the Shimmer Spritz near the tiny butterfly and "wings" area.


Amazing texture from the Rocky Road huh?


Hope you enjoyed the journey...

Supplies:
Imagine - Shimmer Spritz; VersaMark; VersaFine Clair - Nocturne, Morning Mist, Summertime, Tulip Red, Golden Meadow, Creative Medium
Lost Coast Designs - Butterflies, Butterfly Lady, Circles Background
Rinea - Oma's Postcard Stamp
VivaLasVegasStamps - Art circle, Dots, BubbleWrap
Marabu - Art Crayons
Seth Apter - Rocky Road Embossing Powder
Club Scrap - Flower Stencil
Kuretake Watercolors
Prima Watercolor Confections
Stencil
Double Stick Tape 

Little Birdie Hello!

Happy Day Friends!  
I hope you're all having a smashing week!  
Today I wanted to share my little bird card with you....


I created this for the Challenge #53 - Tweet This.  I am just so tickled with how this card turned out...the background was so much fun to make.  To see how I did it, hop on over to the LCD blog....


And there is still time to enter the challenge...


Hope you join in on the fun!  
You might just win $'s for your own LCD & CV stamps!!

Project Swap - Part 1

Have you ever tried to follow someone else's instructions that didn't include instructional photos?  Well that was our challenge this month over at Imagine and let me tell you it was SO much fun!!  Today I have the project I made using Nadine's instructions (which we didn't know at the time.  It was all a bit secret who got our instructions and who's we received, that was part of the fun!  and this is what I created...


This is the card was lots of fun to create, I LOVE the Fresh Greens Kaliedacolor ink pad - the colors are so vibrant and well of course it does help that green is my 2nd favorite color behind blue.  


Nadine's instructions were clear and concise, so easy to follow. I was all good with it until I got to the step where she spritzed the excess ink (from braying the ink onto the cardstock) with water and then used the inked panel to pick up the excess....  Eeeek!  I really didn't want to chance messing up the lovely work but I did it anyway and I'm so glad I did!  The results were amazing.  


It was so funny...we of course couldn't wait to share our creations to find out who's instructions we received and how our project compared to the original...

To see how mine stacks up be sure to stop over and see for yourself...

By Nadine & Roni

Be sure to stop by tomorrow and see the project that Nadine created using my instructions!

Pretty as a Picture Challenge

Lost Coast Designs and Carmen's Veranda's second challenge for the month is Pretty as a Picture (see the inspiration photo at the bottom)!  I decided to play along and this is what I created...


I was inspired initially by the birds nest but then as I looked at it again I was also struck by the colors...vintage barn red, the blue from the eggs and the stark white of the freshly painted trim.  How could I resist.

I started off by cutting a piece of cardstock 4.25 x 5.5" and ran it through a wood grain embossing folder.  I colored the panel using 3 different Nuance reds plus a bit of grey/black.  I then swiped a white ink pad over the raised areas and immediately smudged it around just to give it a weathered feel. I sponged Acorn and Fallen Leaves VersaFine Clair ink around the edges.

I stamped one of birds from the Three Birds stamp set on white cardstock using Paradise blue VFC which was then fussy cut.  I twisted twine into a loopy birds next and stapled it onto the panel. Finally I die-cut a few branches which were sponged with brown ink added them to the card and finished it off with a few white flowers.

My rendition of Pretty as a Picture!


Supplies:
Lost Coast Designs - Three Birds
Imagine - VersaFine Clair - Paradise, Acorn, Fallen Leaves; irRESISTible Pico Embellisher - Electric Blue; Memento Luxe - White; Sponge Dauber
Nuance Pigment Powders
Sizzix Die/Embossing Folder


Big Hugs

Getting a jump start on a Mother's Day card for Mom today...


This month's color at Imagine was Ultraviolet...I knew it would be a perfect pairing with this marble stamp from MFT. It looks great on this Mother's Day card I made for mom.  She loves purple and I hope she'll like this.


I tried to show the sparkle of the embossing powder in this photo....it looks amazing in person.

For the complete supply list and tutorial please see:


Easter Bunny Plaque

Hello Friends!  I wanted to make a little plaque for Easter and I had this darling Marshmallow Bunny stamp from Just For Fun Rubber Stamps!


Here's how I made it....


I started off by cutting the basic plaque shape from a piece of chipboard.


Inked it up a bit and stamped the sentiment on the top.


Next I sponged Radiant Neon ink on cards,


Stamped the image with VersaFine Clair Nocturne (Black)


Embossed and cut them out.


I knew I wanted a bit of grass for the bunnies to hide in so I cut up some paper grass that I then glued to a strip of foam board.


Added bunnies to the card with double stick foam tape, 


Trimmed up the grass 


Added it to the plaque and finished it off with a few flowers and paper twine.


Ready to greet guests!

Supplies:

Imagine: Radiant Neon Ink - Electric Blue, Electric Yellow, Electric Purple, Electric Green, Electric Pink; VersaFine Clair - Nocturne, Acorn; Memento - Rich Cocoa; Embossing Powder; irRESISTible Pico Embellisher - Wedding Dress; Tear It! Tape; On Point Glue
Just For Fun Rubber Stamps - Marshmallow Bunnies
Prima Marketing - Flowers
Chipboard, Foam Board, Double Stick Foam Tape, Paper Twine; Easter Grass

Seth Apter Baked Texture Embossing Powders

Hi Friends!  I am so excited to be able to share a project I made using Seth Apter's new embossing powders - Baked Texture.  If you've not seen them before you're in for a treat. He partnered with a Canadian company - Emerald Creek to bring his creations to reality.  These powders are NOTHING like any powders you have sitting in the back of your craft drawer.  These are a whole new way to envision embossing and I love 'em!!  I have loved embossing from the get go when I first discovered stamping but was saddened that it fell out of favor.  I am hoping this will help bring embossing back in a big way!


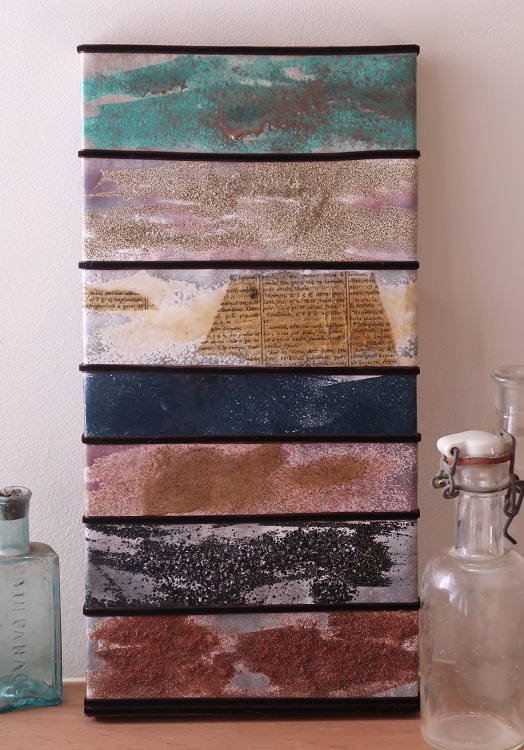
This is a piece of wall art I made using each one of the different powders available at this time....I was going to add a die-cut or sentiment on it but I sort of like how it looks as is.  I'm going to leave it as is for now.

Note: all examples were made using VersaMark Ink by Imagine.


Deep Sea...a lovely mix of chunky clear and blue powders - the more layers you add the less you see the clear and it turns into a deep rich blue - you can see how it varies from the speckled white to the darker areas which comes with each additional layer of powder.


This is probably my favorite...Chunky Rust.  It has tiny little flocking hairs mixed in with a copper color powder. It is AMAZING!!!  It really looks like rust  - the area on the example near the lid is just a single layer of the powder, the center and right has multiple layers of the powder.  The more you add the thicker and rusty-er it looks!


Vintage Beeswax...it really does look like beeswax!  Thinner layers is just a touch of yellow in the mix...thicker colors like on the text really get the lovely warm yellow which can be cracked just like UTEE (Ultra Thick Embossing Enamel). 

NOTE: This ep finishes with a very shiny surface (unlike beeswax), to give it the authentic look SA recommends applying a layer of matte multi-medium over the surface.  I have an easier fix, just take an eraser and rub it over the surface of the cool embossed area!  It takes the shine right off (you can see it in one of the examples below.  This technique will take the shine off any glossy embossing.


Patina Oxide - Super cool green and copper mix...the more you add, the more mixed it will look.  Very pretty.


Dirty Sand - Stuff is really cool, it does feel like sand when it's cooled. It has a rough gritty texture that is going to be so cool on beach and outdoor themed projects.


Rocky Road - I think this is my 2nd favorite - this stuff is wicked cool...really chunky, textured finish - if you want.  You can melt it a lot to get it all smooth and glossy or add a 2nd or 3rd layer leaving those less melted to create lots of texture.


Ancient Amber - this is a very pretty tarnished gold effect...less powder is amber more powder is gold.  Lots of possibilities.


Once my strips were finished I decided to turn them into art...I sponged on VersaFine Clair Morning Mist (a soft grey) over the white areas to really make the embossing stand out.


Then mounted them to a canvas using Creative Medium.  I had sponged the canvas with a trio of browns and copper but when I adhered the embossed strips to the canvas it looked muddled so I used some dark brown velvet ribbon to cover it up and add a bit of definition between each piece.  Turned out much better.


I wanted to share the following photos to show the texture of the various powders for you to enjoy...


This is the photo that shows the "matte" beeswax after it had been rubbed with an eraser.  It started out just as glossy as the Deep Sea ep below it. Quite a difference don't you think?


Top to bottom: Patina Oxide; Dirty Sand; Vintage Beeswax; 
Deep Sea; Ancient Amber; Rocky Road and Chunky Rust

Over all I have to say that these powders are well worth the asking price. These powders are nothing like anything you've ever thought of in an embossing powder. My only hope is that Mr. Apter brings out more of these fun powders in the future!  I'll be first in line to place my order!

Supplies:

Seth Apter Embossing Powder
Imagine - VersaMark Ink; VersaFine Clair, Tear It! Tape; Creative Medium, Sponge Dauber
Canvas Corp - 6x12 Natural Canvas
White Cardstock