Showing posts with label Marabu. Show all posts

Marabu Easy Marble

Happy Monday!

Today I wanted to share a fun and new to me art medium... Marabu's Easy Marble. I have to say I love this stuff.  I have always had an affinity for the marble papers found in vintage books and I've always wanted to try to make it but it was a complicated technique requiring various ingredients to make it just right.   Well, thanks to Marabu we can all make those pretty marbled papers easily!


To get started all you need are a few bottles of Easy Marble, a pan of water and something to marble.  I started out by experimenting with cardstock, bristol cardstock, tags, labels, glossy cardstock, vintage book pages, ledger sheets, sheet music, foam core board, shrink film, MDF shapes and even rocks!  They all worked great! It also works on metal, glass, plastic, and even fabric as long as it won't be washed.


Directions....

NOTE: Wear gloves or be very careful picking your items off of the water - the Easy Marble will stick to your fingers and it can be difficult to remove.  I found that an Orange Oil based cleaner works best to remove the film once it has adhered to your skin/nails.


Fill a pan with water - I used about 1 1/2" - 2"  of water in my pan - just enough to dunk whatever I wanted to marble.  If you are going to be marbling larger items you will want a deeper pan and more water.

Shake all of the colors you want to use vigorously and remove the caps.


NOTE: You must work fairly quickly from here on out.

Sprinkle your base color until it covers the water in the pan.

Note: You need to do this for more open time to work with the medium.  If you don't do this the EM will begin to form a "skin" and adding/swirling the colors after it has made the skin becomes almost impossible.


Sprinkled additional colors as desired.

You may either print as is for large splotches of color or you can swirl the colors around with a tooth pick, skewer or something similar.  I used a wood stir stick.

NOTE: you will pick up some of the medium on whatever you use to swirl the colors. It will look like a gloppy mess but a little is normal. If you pick up more than a small amount then you've taken too long and the skin has formed.  Stop when this happens otherwise you can pull all of the medium off the water with your stirrer.


Place your cardstock or other item on top of the water and give it a gentle press down until it is dunked under the water. Carefully remove it from the water.  Some people use tweezers, I just use my fingers.


Set it aside to dry.

That's it...it is so easy and with 22 colors the combinations are endless!  After just a couple hours of play I ended up with a whole pile of fun pieces to use in my art plus a couple nifty stones, a couple pieces of MDF to decorate my room and a piece of really cool shrink film.

This is just a small sampling of the amazing pieces I made....


This is shrink film!!  It works amazingly well.


MDF Indiana piece - I'm seein' a Cubs state of mind here ;)


White, Silver and Gold...really pretty IRL.


I worked on several Halloween color combos...


This was made with Autumn in mind but it almost looks Christmasy too.


Blues & purples


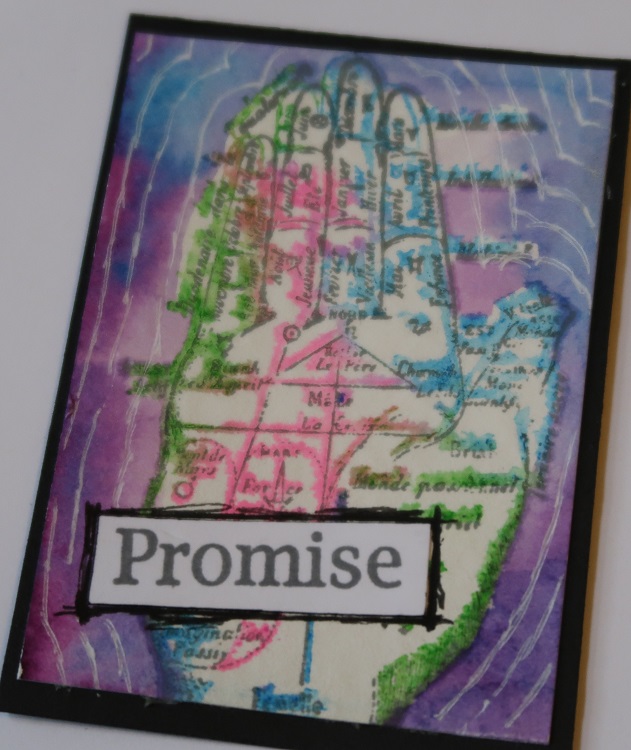
Turquoise, green, pink and purple.


The next 3 are Rinea Silver foiled paper!  
This is Silver/Gold Glossy Foiled Paper.


Silver/Silver Starstruck Foiled Paper


And Silver/Gold Glossy Foiled Paper


Christmas colors of red, green and gold.


and a bit of Valentine's Day in pinks, reds, silver.

This stuff is just soooooooo much fun...you could spend hours just coming up with various color combos to try.  I sure did!  I had to stop a couple times in order to let stuff dry.  I kept running out of room to put the wet stuff - LOL!!


B is for Butterfly!

Hello Friends - I have been playing with my Marabu Art Crayons again experimenting with backgrounds. Today I wanted to share the card I made using one of those experiments...  I also made this card for the current challenge over on the Lost Coast Designs/Carmen's Veranda which is... #56 I Spy...Things That Start With "B".

Stamps: Lost Coast Designs - Butterfly Set, Art Wings Sentiment

Since I knew I wanted to make a butterfly card I wanted a background that would mimic the light and shadows you see where butterflies play...in among the foliage in the garden. Here's what I did...

I started off with a piece of white cardstock that was a bit larger than the actual size of the card panel I wanted to use.  

I started off by scribbling Sunshine Yellow in scattered areas over the panel. 

Next I came in with Kiwi then Apple (both greens) and finally just a hint of Turquoise.  

As I mentioned I was experimenting so initially I tried to blend it all together with first a sponge dauber then a baby wipe but it just didn't give me the look I was going for - it ended up being just a big green blob.  Into the ??? pile.

So then I started over layering the colors in the same fashion but then I blended the colors gently with my finger tip and it looked pretty good.  

Next I took a crazy net looking stencil and placed it over one corner for a test to see if I could pick up some of the color to give lighter and darker areas.  It worked perfectly so I continued to pick up color in just small areas to create a random pattern rather than the exact stencil image. I was able to pull up some of the greens leaving the lighter green and yellows behind to give the exact look I wanted.


I am so happy with how it turned out...that's what I love about experimenting.  I also have several other "experiments" that I can use on other projects or maybe even a few Artist Trading Coins!

Hope this inspires you to pull out your watercolor crayon medium and give it a go.  And if you're so inclined it would be awesome if you would join in the fun over on the Creative Portal and share your "B" inspired card!


Image may contain: 1 person, text

Challenge #56 - I Spy Things That Start with "B"

Supplies:

Lost Coast Designs - Butterfly Set, Art Wings to Fly
Imagine - VersaFine Clair Nocturne
Marabu - Art Crayons
Stencil
Double Stick Foam Adhesive
Green Card Blank

Circles Circles Circles!

Welcome, welcome! I am so excited to share my circle card with you today.  The newest challenge over on the Lost Coast Portal is Round and Round.  I thought this circle stamp was PERFECT for the challenge!


I was so excited because I was able to use my new to me Marabu Art Crayons to color it.  I'm sure you've heard me talk about them but I just have to say they are so much fun to play with!

Anyway, to see how easy this card was to create, hop on over the LCD blog and check it out....

Lost In Circles?

Challenge #55 - Round and Round

Image may contain: 1 person

And be sure to join in on the fun and enter your own card into the Round and Round Challenge for your chance to win $'s to the Lost Coast Design / Carmen's Veranda Rubber Stamps! You can't win if you don't enter!

Spread Your Wings...

Hello Friends!  I hope you're all having a lovely week so far.  Today I wanted to share a piece that I made just for the heck of it.  A bit of Art Therapy if you will.  It's been a stressful couple of weeks and I just wanted to stamp and ink and futz around so that's just what I did.  I had no real plan so this took a few days to come together but I am so happy with how it turned out.....

Stamps - Lost Coast Designs - Butterflies, Butterfly Lady, Circles Background
Rinea - Oma's Postcard (writing)
Viva Las Vegas - artys elements (can't find the names on their web-site...too many stamps to sort through)


So I am playing with my Marabu Art Crayons again...
they are just too much fun!


A bit of scribbling, blending


water spritz - but as you'll note in the photo below, this was covered.


And here's how it turned out.
I should note that this is a piece of foam core board.
Before I added color I used a piece of tape to tear away a couple of the top layers of paper just to give it some character.  You can sort of see it in this photo.


Used a pretty stencil from Club Scrap to pick up some of the color off of the board.


This is what it looked like...

Now, here is where I really started getting into it and forgot to take photos of the process.


I added several layers of stamping using VersaFine Clair Morning Mist, Golden Meadow, Summertime (orange) and Tulip Red.

I then spritzed the left 2/3rds with Frost Shimmer Spritz.  I adds the shimmer of glitter without having to explain why there is glitter everywhere ;)  LOL!!

Next I spread some Creative Medium through a stencil and let it partially dry. I then sprinkled on metal leafing flakes and used a paint brush to gently brush away the excess.  


I then applied VersaMark ink around the edges and embossed using Seth Apter's Rocky Road Baked Texture EP.  LOVE this stuff!

I stamped the butterfly fairy, water colored her plus a few extra tiny butterflies.
She and the sentiment were the affixed to the panel.


A few more looks


You can see the Shimmer Spritz near the tiny butterfly and "wings" area.


Amazing texture from the Rocky Road huh?


Hope you enjoyed the journey...

Supplies:
Imagine - Shimmer Spritz; VersaMark; VersaFine Clair - Nocturne, Morning Mist, Summertime, Tulip Red, Golden Meadow, Creative Medium
Lost Coast Designs - Butterflies, Butterfly Lady, Circles Background
Rinea - Oma's Postcard Stamp
VivaLasVegasStamps - Art circle, Dots, BubbleWrap
Marabu - Art Crayons
Seth Apter - Rocky Road Embossing Powder
Club Scrap - Flower Stencil
Kuretake Watercolors
Prima Watercolor Confections
Stencil
Double Stick Tape 

A Bit of ATC Fun...

You all know how much fun I have making ATC's - they are perfect for the current challenge on the Lost Coast Design Portal - #54 - Mini Me...bitty pieces of art.


I decided to pull out my new Marabu Art Crayons and have a bit of fun.  
For complete instructions on how I made these ATC's 
please see my post over on the Lost Coast Design Portal... 


Have you made any ATC's lately?


They are so much fun when you can only find a small amount of time to play.


June 1st- 14th

Lost Coast Portal to Creativity

You have until June 14th to link up your entries

Please read over out RULES to be sure your entries qualify you to win!
ALL rubber stamp companies are welcome. 
Linky closes Thursday, June 14th at 5 to Midnight PST.  

All entries must be entered in our link up but your don't need a blog to win.  See our RULES page for more info.

Lost Coast Designs Stamps:
Misc. Words
Flaming Heart
Phrenology Heads
ATC Hands Set

Other Supplies:
Marabu Art Crayons
Watercolor Paper
Imagine - VersaFine Clair - Morning Mist, Nocturne
Black Cardstock

Marabu Art Crayons


Hello Friends!  Recently I've been seeing lots of fun new mediums from Marabu and one that particularly caught my eye were their new art crayons. Similar to Gelatos and other water soluble color mediums I couldn't help but wonder if they were different.  Well, recently Joggles* had an amazing sale on them so I snagged 4 different sets of colors. 

*Note - I am not being compensated for posting a link to Joggles...they just have REALLY great sales and I shouldn't be the only one spending my $'s there - LOL!!  ;)  Always happy to help out spending your art $'s too!


So what's the scoop....  First off I have to say that these are the creamy-est sticks I have ever tried! Far smoother than the rest. There is also LOTS of product in this lipstick style tube making them a great bargain.  I will be doing a side-by-side comparison very soon but I just whipped up this card with some goodies laying on my table...


I just scribbled some color onto kraft colored cardstock.


Swished the medium around with a watercolor brush and then stamped over top with VersaFine Clair inks and Joy Clair stamps.  So easy and the colors are so vibrant even on the kraft. I can see these being loads of fun in the near future!

Supplies:

Marabu Art Crayons
Imagine - VersaFine Clair Inks
Joy Clair - Happy 4th
Waterbrush
Kraft Cardstock