Showing posts with label holidays. Show all posts

Happy 4th of July!!!

Hope you all have a safe and enjoyable 4th of July!!!


Just a little something from me to you with the help of Joy Clair stamps and Imagine products.


It even has built in fireworks in the way of sparklie embossing powder!!
Ahhh the wonder of VersaFine Clair Inks - they make stampin' so much fun.


Take care friends!!

Happy Easter Friends!

(German Postcard from 1909)

Hope you have a blessed day!

Big Hugs

Getting a jump start on a Mother's Day card for Mom today...


This month's color at Imagine was Ultraviolet...I knew it would be a perfect pairing with this marble stamp from MFT. It looks great on this Mother's Day card I made for mom.  She loves purple and I hope she'll like this.


I tried to show the sparkle of the embossing powder in this photo....it looks amazing in person.

For the complete supply list and tutorial please see:


Easter Bunny Plaque

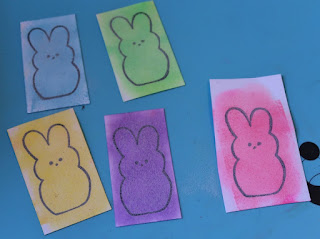
Hello Friends!  I wanted to make a little plaque for Easter and I had this darling Marshmallow Bunny stamp from Just For Fun Rubber Stamps!


Here's how I made it....


I started off by cutting the basic plaque shape from a piece of chipboard.


Inked it up a bit and stamped the sentiment on the top.


Next I sponged Radiant Neon ink on cards,


Stamped the image with VersaFine Clair Nocturne (Black)


Embossed and cut them out.


I knew I wanted a bit of grass for the bunnies to hide in so I cut up some paper grass that I then glued to a strip of foam board.


Added bunnies to the card with double stick foam tape, 


Trimmed up the grass 


Added it to the plaque and finished it off with a few flowers and paper twine.


Ready to greet guests!

Supplies:

Imagine: Radiant Neon Ink - Electric Blue, Electric Yellow, Electric Purple, Electric Green, Electric Pink; VersaFine Clair - Nocturne, Acorn; Memento - Rich Cocoa; Embossing Powder; irRESISTible Pico Embellisher - Wedding Dress; Tear It! Tape; On Point Glue
Just For Fun Rubber Stamps - Marshmallow Bunnies
Prima Marketing - Flowers
Chipboard, Foam Board, Double Stick Foam Tape, Paper Twine; Easter Grass

Happy Valentine's Day Friends!!


First I wanted to share my steampunk inspired Valentine's Day Tag with you!

And I also have a selection of vintage Valentine's Day cards from my collection...

Enjoy!


Hope you all have a lovely day!!

Multi Step Rose Valentine's Day Card

I don't know about you but it takes me a long time to line up the multi-step flowers...even the ones that are just 2 steps.  Prior to VersaFine Clair ink I never would have been able to bring the rich texture of embossing these images, the stamping time just took too long.  That has all changed though because the extended "stick" time for VersaFine Clair is a game changer.  


I was able to stamp all of these roses - both the Nocturne (black) and Tulip Red - and still have time to emboss it.  The best part? I was able to stamp these images without having to worry about smudging the inks. You know how most pigment inks stay wet so they can hold the powders?  Well the VF Clair feels dry to the touch in a few seconds but it will grab hold of the embossing powders for 10, 15, 20+ minutes later...while still feeling dry!!!  It honestly seems like it's magic.

For complete directions on how to make the card above please see...


A Few More Pegged Christmas Cards!

I am really trying to finish up Christmas cards and get them sent out reasonably close to Christmas...some may not make it but at least it's the thought that counts right?  


For some reason this year I seem to be making more portrait instead of landscape oriented cards this year. Usually it's the other way around.  Anyway, here's one of the landscape cards I made this session...  Don't ya just love those lights?


A poinsettia wreath.


This is such a fun card. The "tree" is actually a pine branch but it was laying on it's side on my desk and I noticed that it looked like a charlie brown tree so I decided the snowman needed his very own tree - LOL!!  It's decorated with a trio of tiny flowers (in red) and a 5 petal flower in gold for the star on top!


I love this card - I might have to go against my policy (of no dups) and make a few more of these...It's very "me".  Anyway, the sentiment is from Joy Clair's Rustic Christmas set...goes perfectly with the peg stamps don't ya think?  I may add more glitter if I make more...need to bump up the sparkle factor - LOL!!

So that's what I've been doing...how about you?
Ready for the big day??

Supplies:

Rubber Stamp Tapestry - Peg Stamps
Imagine - VersaMagic (chalk ink); VersaFine; Memento; On Point Glue (to adhere the glitter)
Club Scrap - Cardstock, Ribbon
Joy Clair - Rustic Christmas Sentiment
Glitter
MFT - Stitched Circle Dies

Farmer Christmas Card

Do you know how hard it is to find a farm themed Christmas card?  I decided that this year I'd make my own using Delicata Inks from Imagine.


I made my very own animal Christmas tree and topped it with a gold star!
I gave each animal a bit of holiday spirit with some glitter, a Santa hat and even some reindeer horns. 


I love how it turned out and hope the recipient does too!

Supplies

Imagine

Delicata � Ruby Red, Emerald Green, Golden Glitz, Dark Brown Shimmer
Radiant Neon Amplify! � White
Sponge Dauber
On Point Glue
Memento Ink � Northern Pine


Other

Stampers Anonymous � Livestock
JoyClair Stamps � Antlers, Hat
My Favorite Things � �Merry Christmas� Sentiment
Rubber Stamp Tapestry � Poinsettia, Holly Leaf
Red Glitter
Cardstock � Cream, Kraft
Card base � Dark Green

Christmas is in the Air

Over the long weekend I decided to take some time and make a few Christmas cards so I pulled out my peg stamps and played a bit.


For my first card I used the set Twinkle Twinkle - I stamped the shape of a Christmas tree with the cedar stamp using Pistashio Memento Ink; next I added the lights and wires using VersaFine Onyx ink and finished it off with the ornaments.  I also used a couple stamps not included in the kit - the little sitting mouse and Merry Christmas sentiment.  I added the light halo using a sponge dauber with matching ink.  I wish you could see it IRL because then you would also see that the lights are a bit sparklie from the touch of Sparkle irRESISTible Medium I covered them with.  

The card background was stamped using snowflakes (White VersaColor ink) and a trio of tiny flowers (in Delicata Golden Glitz).


This is my "country Christmas" card...  I used Southern Pine set around the top and bottom edges. The sentiment is from Just From Fun stamps.  It's a bit rustic looking which I thought goes perfectly with the pine cones.


Finally I did something a bit different with the Holiday Joy stamp set. I used the leaves, flowers and squiggles combined them with the poinsettia stamp from Pine & Poinsettia set to make my own "poinsettia tree".  The barrel stamp is something I had in my stash (sorry, don't recall which set it's from). 

The background for this card was stamped with candy canes, stockings and a tiny little gift which is just darling! 

This card is a bit different for me as it leaves traditional holiday colors behind and I used Love Letter which has a rose hue, Bahama Blue and Bamboo Leaves green.  Not exactly what you think of for Christmas but I think it works.

Anyway, that was my bit of stress relief over the long holiday weekend ;)

Happy Thanksgiving!


Sending you blessings and good wishes


now and through out the coming year.


Stay safe and enjoy the day


Happy Thanksgiving!!!

My Blue Poinsettias

Today I have another card to share made using the Power Poppy digital stamp Poinsettia and Pomegranates. It's such a pretty image, I really like it.  It's lots of fun to color too!


I mentioned last week that I'd like to try one in blues because it's my favorite color.  As it happens Color Throwdown #469 consisted of a couple shades of blue paired with silver. Of course that's usually a nice combination for snow and winter scenes but hey, it works for flowers too right?  That's my story and I'm stickin' to it!

I colored the images using Prismacolor Colored Pencils and silver for all of the foliage. The sentiments are from the 2017 Holiday kit - Scandinavian Holiday.


I was lovin' the colors so much I even colored a piece for the inside as well. I usually like to leave the inside of the card for correspondence but when this one gets sent I'll just have to write on a separate piece of paper.

I would like to submit this card to the following:


Supplies:

Power Poppy - Poinsettias & Pomegranates 
Imagine - VersaFine, On Point Glue
PrismaColor Colored Pencils
ClubScrap.com - Scandinavian Holiday Sentiment
Cardstock
Card Base
Glitter


Poppy Power - Portion Control Challenge

Hello Friends!

Today I wanted to share a card I made in response to Poppy Power's Portion Control Challenge.  They challenge you to use just parts of an image instead of the whole thing.  I decided to give it a shot. I used their stamp Poinsettia and Pomegranate digital stamp set.  I resized and arranged several copies of the image on an 8.5 x 11" sheet of cardstock and cut it up so I could make 4 cards from one print.


And here's my first attempt!  I decided to go with a bit of a non-traditional color scheme and used Lavender, Dahlia Purple, Pink and Mauve as my main color palette. The poinsettias and pomegranates were colored using PrismaColor colored pencils, the snowflakes were stamped using VersaMagic ink (chalk ink) and the sentiment was stamped with VersaFine Onyx Black ink.  It doesn't show up but I added dots of On Point Glue and sprinkled with extra fine clear glitter.  It gives the card a lovely shimmer IRL.

So there you have it...my attempt at Portion Control!  I'm hoping to color one up using blues and maybe even a traditional red for Christmas...just have to wait and see.

I hope you're inspired to give it a shot too :)


Supplies:

Imagine - VersaMagic, VersaFine, On Point Glue
PrismaColor - Colored Pencils
ClubScrap.com - Scandinavian Holiday - snowflake stamps, sentiment
Cardstock, glitter