Showing posts with label die-cuts. Show all posts

Rinea Foiled Paper Feathers & Aztec Card


Hello friends!
 I am over on the Rinea blog today sharing this fun technique 
used to create all sorts of nifty die-cuts made with beautiful foiled papers!
The background was created by stamping Joy Clair's Aztec Background stamps onto a piece of lavender cardstock using VersaMagic inks (chalk ink) and a sentiment from the Butterfly Kisses set.

Check out the following for complete instructions:


Supplies:

Joy Clair - Aztec Background, Butterfly Kisses
Imagine - VersaMagic, VersaFine Clair
Spellbinders - Feather Dies
Cardstock
Xyron Adhesive


A Little Gnome Told Me....

August 1st, 2018!!!

Can you believe it?
I don't know where the year has gone...

It sure doesn't feel like  it should be August already.

Well I thought I'd share the first of a little series of Gnome cards I've made for you all...


A little gnome told me that
Gnome is where the Heart is.

And here are 3 little guys to prove it! 
I had so much fun making this card using stamps from the Fairy Garden set. I started off by stamping the stump from the Budding Spring UM set, from there I stamped the 3 little Gnomes and went on from there. Everything was watercolored after I was satisfied with all of the little mushrooms, critters and such.  This is such a fun stamp set I don't know if I'll be able to wait to show you the other cards I made.


Supplies:

Rubber Stamp Tapestry - Fairy Garden, Whispers from the Garden, Budding Spring 
Imagine - VersaFine Clair
Kuretake Watercolors
Watercolor Paper
Cardstock
MFT - Stitched edge rectangle die


Ocean Babies

Playin' with some new peg stamps today...Ocean Babies!

These little devils are so cute, they make really fun cards...


Having fun mixing up colors with a blue octopus baby, a green lobster, pink whale and orange seahorses which isn't really a stretch since some of them are on the orange side.  I almost never use orange but I really wanted to do something a bit different.  I think it turned out pretty good.


A fun underwater scene.  All of the foliage & coral are different peg stamps just arranged unexpectedly. 


Pairs of babies...the background is a lovely 

Supplies:
Rubber Stamp Tapestry - Ocean Babies, Whispers from the Garden 
Imagine - VersaFine Clair, Memento Dye Inks, VersaMagic (chalk ink), Sheer Shimmer Spritz - Sparkle
Rinea - Turquoise/Turquoise Starstruck Foiled Paper
Sizzix - Sentiment Dies
Cardstock
Twine

Faux Ormolu Glass Bottle

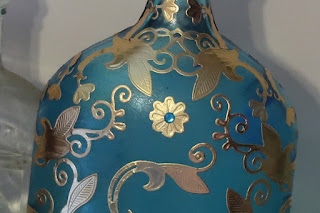
You all know how much I love vintage goodies well today I have a fun project I made using Rinea foiled paper paired with a vintage glass bottle and Imagine's StazOn Studio Glaze.  Check it out....


Ormolu is the term used to describe gilt brass on decorative art objects from the 18th and 19th centuries also known as fire gilding. I decided to create a bit of faux ormolu on this very cool vintage glass bottle I found recently at a flea market.


Wash the bottle to remove any foreign dirt, debris and oils from the surface.


Use an Ink Blusher to apply a coat of Blue Hawaii StazOn Studio Glaze to the surface of the bottle.


After the bottle has dried you will have a lovely cloudy semi translucent "glaze".
It brings to mind the look of sea glass.


Die-cut 3-4 sheets of Gold/Gold Glossy Foiled Paper using desired filigree dies.
(These dies are from the Spellbinders monthly die club.)


Remove the die-cut foiled papers from the machine and carefully peel each piece apart.
Depending on the die you may have more or less embossed areas than others.
Keep this in mind for placement. I used the highly embossed pieces (those closest to the front of the die) for prominent areas and the less embossed (3 & 4th die cut layers) in areas that the embossing wouldn't be as noticeable (sides & back).


Run all of the pieces through the Xyron Sticker Maker.


Carefully peel off the foiled filigree pieces and apply them to the bottle as desired.


The results are stunning!
It looks like the bottle is encased in a gilt filigree cage.


I finished off the jar with this very elaborate antique perfume bottle stopper.

Supplies:

Imagine - StazOn Studio Glaze - Blue Hawaii; Ink Blusher
Xyron Sticker Maker
Antique Glass Jar, Bottle Stopper
Faux Gemstones
Wire


CSI Case File No. 256

Hello Friends! 

This month the Imagine Artist Team is joining up with CSI Challenge blog to share a bit of inspiration. I was assigned case file #256 to try to solve the case (shown below) and this is what I came up with...


I was so excited about this as I had the perfect stamps to go with "The Scene" and since we like to travel so I thought the inspiration was the perfect way to celebrate how we "camp" on road trips!  You see, our idea of camping is the Holiday Inn, Marriott, Hampton Inn and Suites, etc.  The photos are from a trip earlier this year when we had to stop in Harrisburg/Hershey area during a pop up snowstorm. We lucked out and got the last room available at Spring Hill Suites and it was beautiful to boot!   


My inspiration from Case File No. 256 was "The Scene", Colors, Banners and more.  


These stamps from Just For Fun Stamps went with the theme perfectly!!


And I had this Club Scrap "Road Trip" stamp that worked out so well...
I also used a map and travel sign stamps to create various background pieces as well...


Hope this inspires you to pull out your stamps, inks and photos to scrap your travels.

Supplies:
Imagine - VersaFine Clair - Nocturne, Cheerful, Tulip Red, Warm Breeze; Memento Dual Tip Markers
MFT - Banner Die
Just For Fun Rubber Stamps - Camper 1, Camper 2, Wash Tree, Campfire
Club Scrap - Vintage Travel Stamps, Washi Tape, Cardstock


Multi-Color Stamping


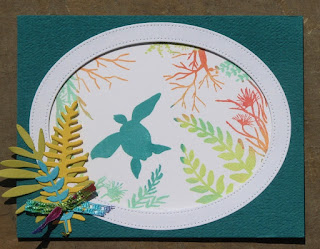
Hello Friends!  It's so nice to have fun tools to help you with art and today I wanted to share how I made this card...my multi-colored sea turtle scene.

Directions: 

Trim a piece of white cardstock a bit smaller than an A2 card.  

Place the card panel into a stamp positioner (like a Misti or similar tool).  

Center the stamp on the card panel face down on the panel, close the lid of the positioner and open. Your stamp should now be affixed to the lid.

Ink the turtle portion of the image with desired color then stamp.

Now it's time to have fun. I like using my Memento Dew Drop Ink Pads for this technique as you can add ink in smaller areas than you can with larger pads.  Select desired color of ink and dab it onto portions of the image and stamp.

Repeat with one or more additional colors until the entire image has been stamped on the card.

The results will be a very colorful fun card!
Hope this has inspired you to play a little with your stamp positioner!

Left-Overs Card

Happy Monday Everyone!

I hope you had a spectacular weekend!

If you recall over the weekend I shared the Sunflower & Watermelon Welcome Summer banner with you.  Well I had a few extra pieces left over that I wanted to use up so I created a fun left-overs card!


I chose a piece of Emerald/Emerald Starstruck foiled paper for the background and then layered on all of the extra bits I had left over. I die-cut the "hello" sentiment from a scrap of Ebony/Gold Glossy foiled paper.

Now I have a shimmery, sparklie fun card to share this summer.
Who knew left-overs could be so good!

Supplies:

Rinea Ebony/Gold Glossy Foiled Paper
Rinea Silver/Silver Starstruck Foiled Paper
Rinea Gold/Gold Glossy Foiled Paper
Rinea Ruby/Ruby Starstruck Foiled Paper
Rinea Fuchsia/Fuchsia Starstruck Foiled Paper
Rinea Emerald/Gold Glossy Foiled Paper
Rinea Mocha/Gold Glossy Foiled Paper
Sizzix - Watermelon & Sunflower Dies
My Favorite Things - "hello"
X-cut Banner Die

Sunflower & Watermelon...Welcome in Summer!!

I am so excited to welcome in summer with my project today but I am also excited because this is my first official post for the Rinea Design Team!  I think you're going to love this foiled paper!


And here it is....my Welcome Summer Banner!!  I die-cut both the inside and scalloped outside banner pieces then adhered them together. All of the components for the watermelons and sunflowers were then cut using sizzix dies and assembled accordingly. The letters were die cut from the Ebony/Gold Glossy Foiled Paper using an alphabet die set from My Favorite Things.  

All of the individual pieces were then glued to the individual banners and left to dry.  Once the glue had dried a hole was punched at each corner of the top of each banner and threaded onto a green/gold ribbon from May Arts.


For complete instructions please see: Welcome Summer Banner by Roni
So easy yet a stunning piece sure to draw oohs and aaahs from your guests this summer!


This month Rinea introduced the new Misfits Variety Pack...a mystery collection filled with both glossy and starstruck foiled papers in a variety of colors. A fun pack to get a taste of just how handy Rinea foiled paper is.


Another fun brand new variety pack is the Magical Foiled Paper Variety Pack! Perfect for all those Disney projects you've been putting off making!  Wait no more - these lovely foiled papers are reason enough to get them done!  I'll have a project to share with you later this month using this collection ;) 


Rinea Patriotic Foiled Paper Variety Pack
Rinea also released the Patriotic Foiled Paper Variety Pack! A lovely collection of the ole' red, white and blue! A perfect choice to show off your patriotism on cards, in scrapbooks, home decor, mixed media and more!!  Unlike the first two new variety packs, the Patriotic Foiled Paper Variety Pack is available for a limited time only. Once it's gone it won't be available again this year!!! I so can't wait to share the project I made using this collection!!

Supplies:

Rinea Ebony/Gold Glossy Foiled Paper
Rinea Silver/Silver Starstruck Foiled Paper
Rinea Gold/Gold Glossy Foiled Paper
Rinea Ruby/Ruby Starstruck Foiled Paper
Rinea Fuchsia/Fuchsia Starstruck Foiled Paper
Rinea Emerald/Gold Glossy Foiled Paper
Rinea Mocha/Gold Glossy Foiled Paper
May Arts - Ribbon
Sizzix - Watermelon & Sunflower Dies
My Favorite Things - Alpha Dies
X-cut Banner Die

Yellow & Orange Challenge!

Happy May Day Everyone! 

Today I wanted to share the new challenge on the Lost Coast Designs & Carmen's Veranda - Yellow and Orange!  Yes, you must use yellow and orange somewhere on your creation and do I have a card for you....


a Weinermobile!!!!

I absolutely love this image...it brought back so many memories. My family and I actually got to see a real Weinermobile when we visited The Henry Ford Museum when the boys were young.  I even got a Weinee Whistle (and I still have it).  

So on to the card... I started off by trimming a cover from a vintage atlas down to size. It was spitzed with water and then sprinkled with yellow Nuance pigment powder. After it had dried I rubbed a bit of orange and yellow VFC ink through a circle stencil.  I then smeared a bit of Radiant Neon Amplify! through a second stencil as well. I removed the stencil and heated the Amplify! to puff it up. This panel was affixed to a white card base and I added a few hand drawn lines around the outer edge.

I stamped the Weinermobile twice on white cardstock.  The first was sprinkled with orange Nuance and the second I watercolored the car with yellow Nuance.  Once they were both dry I trimmed the  orange weiner and added it to the yellow car body.  It was then affixed to the card using double stick foam tape.

I die-cut the sentiment and added a few sequins to finish it off.

Now it's your turn!!

No automatic alt text available.

Be sure to check out the other cool Yellow and Orange creations
and 
enter your own piece to win fun stamps from 
Lost Coast Designs & Carmen's Veranda!!

I would also like to enter this into the Verve Challenge - YELLOW!!


as well as Country View Challenge - Be Humorous.

Country View Challenges

Supplies:
Imagine - VersaFine Clair Nocturne, Radiant Neon Amplify! - Neon Yellow
Nuance Pigment Powders
Die-Cut, Vintage Map Page, Sequins, Cardstock

Bottle Cap Art Doll

I have another inspiring creation for the Lost Coast Design & Carmen's Veranda challenge - Stamped Backgrounds!


Isn't she great?
Hope on over to the LCD/CV Blog to check out how she was made...


Image may contain: text

Don't forget, today is the last day to enter the Stamped Background challenge!!
You don't want to miss out on your chance for free stamps.

Lost Coast Designs & Carmen's Veranda - Stamped Background Challenge!

Hello my ink stained friends!  I have some exciting new to share with you today...I have been chosen to be on the design team for Lost Coast Designs & Carmen's Veranda!!  I am very excited about this - I have admired these stamps for a very long time, they are very artsy and work well not only on cards but in mixed media arts and collage too!  I can't wait to share my creations with you, I have been having lots of fun with them.

Every 2 weeks LCD/CV hosts a new challenge...my first piece I get to share with you was inspired by their new challenge - Stamped Backgrounds.


I started off by stamping the Pencils Background onto a piece of white cardstock using VersaFine Clair Nocturne ink. Each pencil was colored using a variety of watercolor and colored pencils. This was mounted on a blue card blank.

The next layer is a piece of self adhesive vellum that was colored with Nuance pigment powder. 

Georges and Lewis was stamped once in VF Clair Nocturne and a second time with Paradise blue VFC ink.  The shirt was trimmed from the second image and affixed to the first.  I stamped an extra pencil with green, brown, grey and pink ink which was trimmed and pieced back together to create the pencil which I tucked under his arm.  He was affixed to the card panel using double stick foam tape.

Finally I die-cut the sentiment and inked it with a bit of the Paradise ink.


I hope you hop on over to the blog to check out the other inspiring creations and possibly enter one of your own for your chance to win $$$ to acquire your own Lost Coast Designs & Carmen's Veranda stamps!

Supplies:

Imagine - VersaFine Clair - Nocturne, Paradise, Rain Forest, Morning Mist, Acorn, Charming Pink, Sponge Dauber
Die-Cut, Vellum, Cardstock

Pretty as a Picture Challenge

Lost Coast Designs and Carmen's Veranda's second challenge for the month is Pretty as a Picture (see the inspiration photo at the bottom)!  I decided to play along and this is what I created...


I was inspired initially by the birds nest but then as I looked at it again I was also struck by the colors...vintage barn red, the blue from the eggs and the stark white of the freshly painted trim.  How could I resist.

I started off by cutting a piece of cardstock 4.25 x 5.5" and ran it through a wood grain embossing folder.  I colored the panel using 3 different Nuance reds plus a bit of grey/black.  I then swiped a white ink pad over the raised areas and immediately smudged it around just to give it a weathered feel. I sponged Acorn and Fallen Leaves VersaFine Clair ink around the edges.

I stamped one of birds from the Three Birds stamp set on white cardstock using Paradise blue VFC which was then fussy cut.  I twisted twine into a loopy birds next and stapled it onto the panel. Finally I die-cut a few branches which were sponged with brown ink added them to the card and finished it off with a few white flowers.

My rendition of Pretty as a Picture!


Supplies:
Lost Coast Designs - Three Birds
Imagine - VersaFine Clair - Paradise, Acorn, Fallen Leaves; irRESISTible Pico Embellisher - Electric Blue; Memento Luxe - White; Sponge Dauber
Nuance Pigment Powders
Sizzix Die/Embossing Folder


Big Hugs

Getting a jump start on a Mother's Day card for Mom today...


This month's color at Imagine was Ultraviolet...I knew it would be a perfect pairing with this marble stamp from MFT. It looks great on this Mother's Day card I made for mom.  She loves purple and I hope she'll like this.


I tried to show the sparkle of the embossing powder in this photo....it looks amazing in person.

For the complete supply list and tutorial please see:


Stampin' Trees

Hello Friends!  I hope you're all doing well today.  I know many of you have been battling a late winter snow storm - I hope you're all safe and snug wherever you are.

Today I wanted to share a couple of cards I made today using the UM stamp set - Trees from Rubber Stamps Tapestry.


The first card was made for my sweetie...  I stamped the bare tree using VersaFine Clair Pinecone.  I then used a peg stamp that is called "Heart Dust" (isn't that darling?) to stamp the VersaFine Clair ink colors Glamorous (deep pink), Tulip Red and Charming Pink (bright pink)  VersaFine Clair.  You won't believe what I used for the grass...a Pineapple Top! It worked like a charm :)


This is a more traditional spring tree filled with lovely flowers and a sprinkling of flowers beneath as well.  A picture I'm sure we're all ready for!  The background for this card was stamped with a tri-flower stamp using VersaMark ink.

Supplies:

Rubber Stamp Tapestry - Trees UM set; Heart Dust, Pineapple Top, Oak Leaf, Flowers Three Ripply, Cherry Blossoms
Imagine - VersaFine Clair - Pinecone, Acorn, Tulip Red, Glamorous, Charming Pink, Verdant, Green Oasis, Golden Meadow, Blue Belle; VersaMark
Club Scrap - cardstock
Altenew - Painted Greetings
MFT - Stitched Dies

Succulents

Hello friends...I hope you're having an inky day!

Today I have 3 totally different projects featuring one stamp set - Succulents by Rubber Stamp Tapestry.


My first project uses a canvas I made using yesterdays technique of pairing pigment powders ~ in this case Lindy's Magical Shakers ~ with white glue.  The succulents were masked & stamped then colored with Chameleon Markers and fussy cut.


My next project is this fun "congrats" card I made using the hen from the set.  I stamped the succulent with VersaFine Clair Nocturne (black) then stamped a circle of color over each image (Verdant and Chianti VFC).  I added the little dots using a peg stamp then added the die-cut sentiment.


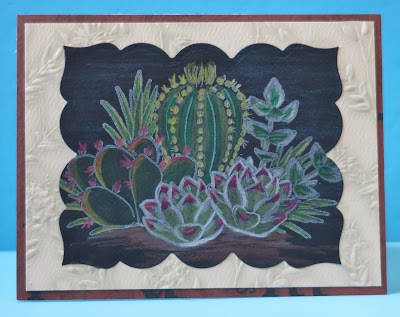
I had lots of fun with the final card.  I stamped/masked the succulents with white ink on black cardstock. I then colored the succulents with a fun set of colored pencils from Crayola designed to work on dark cardstock.  There are so very pretty metallics and shimmery colors in this set.  I was totally surprised, it is NOT what I was expecting from Crayola but boy did these pencils deliver.  

As luck would have it this months challenge at House of Cards is to use colored pencils on dark cardstock!  I'm happy to enter this card into their challenge.


Image result for design hues pencils

Supplies:

Rubber Stamp Tapestry - Succulents
Imagine - VersaFine Clair, Memento Luxe
Lindy's Magical Shakers
Crayola - Colored Pencils
Club Scrap - Cardstock
Canvas
White Glue
MFT - Die-Cuts

Steampunk Inventor Gothic Arch

Last Sunday was Thomas Edison's birthday...he was and in my mind will probably always be one of the great inventors of our time.  In honor of his birthday they named February 11th National Inventors Day and I made this fun Gothic Arch to celebrate them both!


There's a little bit of everything on the arch...vintage ephemera, stamping, die-cuts, Vintage Creative Medium (my favorite), Metallic Creative Medium (Bronze, Silver, Gold and Copper); lots of embossing powders on the Gothic Arch base (red, copper and patina) as well as the fun vintage images.  I love when I can mash 'em all together to make something like this.

If you'd like step by step instructions 
and a complete list of supplies you can find it here - 


Geranium Magic

Have you seen 2 of the newest sets of stamps over at Rubber Stamp Tapestry?  They are themed around geraniums!! Cottage GeraniumRed Geranium -  I just love these sets.  Geraniums are some of the first flowering plants I can remember aside from violets.  My grandma had a small nursery/greenhouse and these were always a favorite.  Here's what I made...


The first card was stamped and embossed using Imagine's VersaFine Clair. I was able to stamp the entire piece then emboss in one fell swoop - no stamp emboss, stamp emboss, etc.  This ink is just amazing!  All stamps are from the Red Geranium set.


This is a combination of both geranium sets along with a tiny single flower from my stash...  It just needed that little pop of red don't you think?  Inks are a combo of Memento  & VFC.  


This card was so much fun.  I had a piece of cardstock laying on my desk that had 2 holes cut out of it from a previous project.  I used that piece of cardstock as a stencil to stamp through.  All of the inks were VersaFine Clair that was stamped and embossed.  Simply stamp through the stencil, move the stencil and stamp some more.  Once all the stamping was done, embossed using a clear EP.  I wish you could see it in person...the colors are stunning.  I know blue isn't the usual color for geraniums but I thought it worked out well.


My final card was made using the Cottage Geranium set...the bucket I planted my geraniums in is also a RST stamp.


Supplies:

Rubber Stamp Tapestry - Cottage Geranium, Red Geranium
Imagine: Memento Dye Ink; VersaFine Clair Ink; Clear Embossing Powder
Club Scrap.com - Sentiments
Cardstock
MFT Dies