Showing posts with label Rinea. Show all posts

Rinea Foiled Paper Feathers & Aztec Card


Hello friends!
 I am over on the Rinea blog today sharing this fun technique 
used to create all sorts of nifty die-cuts made with beautiful foiled papers!
The background was created by stamping Joy Clair's Aztec Background stamps onto a piece of lavender cardstock using VersaMagic inks (chalk ink) and a sentiment from the Butterfly Kisses set.

Check out the following for complete instructions:


Supplies:

Joy Clair - Aztec Background, Butterfly Kisses
Imagine - VersaMagic, VersaFine Clair
Spellbinders - Feather Dies
Cardstock
Xyron Adhesive


Steampunk Inspiration

Time is running short on the "No Body Here" challenge at Lost Coast Designs.  You have just today and tomorrow to enter your creation.


I made this card/tag with the challenge in mind. I love the steampunk stamps available at Lost Coast and this mechanical horse is one of my favorites. I smudged up the tag for a bit of a vintage feel.  The background was created by tearing bits of Rinea foiled paper and layering them onto a piece of cardstock. Once the cardstock was covered I ran it through in a gear embossing folder.

I love how it turned out and can't wait to send it on it's way!

Be sure to stop by and add your creation to the challenge -


Supplies:

Lost Coast Designs - Steampunk Mechanical Horse; Words
Rinea Copper/Gold Glossy; Mocha/Gold Glossy; Silver/Gold Glossy; Ebony/Gold Glossy Foiled Papers
Imagine - VersaFine Clair; Sponge Daubers
Tag
Fibers
Sizzix - Embossing Folder

Ocean Babies

Playin' with some new peg stamps today...Ocean Babies!

These little devils are so cute, they make really fun cards...


Having fun mixing up colors with a blue octopus baby, a green lobster, pink whale and orange seahorses which isn't really a stretch since some of them are on the orange side.  I almost never use orange but I really wanted to do something a bit different.  I think it turned out pretty good.


A fun underwater scene.  All of the foliage & coral are different peg stamps just arranged unexpectedly. 


Pairs of babies...the background is a lovely 

Supplies:
Rubber Stamp Tapestry - Ocean Babies, Whispers from the Garden 
Imagine - VersaFine Clair, Memento Dye Inks, VersaMagic (chalk ink), Sheer Shimmer Spritz - Sparkle
Rinea - Turquoise/Turquoise Starstruck Foiled Paper
Sizzix - Sentiment Dies
Cardstock
Twine

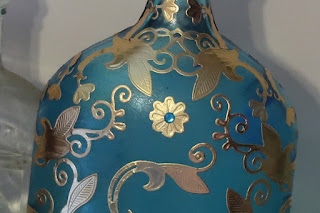
Faux Ormolu Glass Bottle

You all know how much I love vintage goodies well today I have a fun project I made using Rinea foiled paper paired with a vintage glass bottle and Imagine's StazOn Studio Glaze.  Check it out....


Ormolu is the term used to describe gilt brass on decorative art objects from the 18th and 19th centuries also known as fire gilding. I decided to create a bit of faux ormolu on this very cool vintage glass bottle I found recently at a flea market.


Wash the bottle to remove any foreign dirt, debris and oils from the surface.


Use an Ink Blusher to apply a coat of Blue Hawaii StazOn Studio Glaze to the surface of the bottle.


After the bottle has dried you will have a lovely cloudy semi translucent "glaze".
It brings to mind the look of sea glass.


Die-cut 3-4 sheets of Gold/Gold Glossy Foiled Paper using desired filigree dies.
(These dies are from the Spellbinders monthly die club.)


Remove the die-cut foiled papers from the machine and carefully peel each piece apart.
Depending on the die you may have more or less embossed areas than others.
Keep this in mind for placement. I used the highly embossed pieces (those closest to the front of the die) for prominent areas and the less embossed (3 & 4th die cut layers) in areas that the embossing wouldn't be as noticeable (sides & back).


Run all of the pieces through the Xyron Sticker Maker.


Carefully peel off the foiled filigree pieces and apply them to the bottle as desired.


The results are stunning!
It looks like the bottle is encased in a gilt filigree cage.


I finished off the jar with this very elaborate antique perfume bottle stopper.

Supplies:

Imagine - StazOn Studio Glaze - Blue Hawaii; Ink Blusher
Xyron Sticker Maker
Antique Glass Jar, Bottle Stopper
Faux Gemstones
Wire


Star Spangled Patriotic Wreath

Are you ready to get your Red, White and Blue on?

I sure am with this fun and easy patriotic Star Spangled Wreath....


It's so easy to make using Rinea's Patriotic Foiled Paper Variety Pack, just cut out the stars, add score lines and pinch the star into a 3-D delight!  For complete instructions, please see my post on the Rinea blog here: 3-D Star Spangled Wreath by Roni.


A couple more close up images of those lovely stars....
don't ya just love that shine, shimmer and sparkle?


Made using the Limited Edition 

Rinea Patriotic Foiled Paper Variety Pack


Magical Origami


Happy Day my Ink Stained Friends!

Today I am thrilled to share a bit of origami with you all.  If you have visited before you know I like to dabble with origami from time to time and I wanted to share how perfect Rinea's foiled papers are for this fun paper art.

If you recall I mentioned a couple weeks ago that Rinea released a few new variety packs this month - Misfits, Patriotic and Magical...which is what I want to share with you today.


Aren't they adorable???  I am so excited at how they turned out.

I searched for a good pattern/video for Mickey for quite some time - 
there are lots of them out there but very few actually turn out looking like THE Mouse. 

I stumbled upon this video and gave it a try...


I am so happy I did, he turned out so cute and it was easy to switch a few things up to turn it into Minnie.


He was made using Ebony/Glossy Gold Foiled Paper and Ruby/Ruby Starstruck Foiled Paper from the Magical Foiled Paper Variety Pack and Silver/Glossy Gold Foiled Paper. His eyes, nose, mouth and buttons were all free hand cut (which is really easy). 


Minnie was made using the same instructions from the video above but I did change the dimensions a bit when folding to give her a slightly different look.  I also cut her features a bit differently from Mickie's.


You'll also notice that I gave Minnie her iconic red bow.  This is another tricky piece of origami which believe it or not I had more trouble with than the mouse!  I finally figured it out and I'm glad I did because it's the perfect finishing touch for her don't you think?

The video for this can be found here:


Have a magical day friends!!

Supplies:

Scissors
Adhesive
Sharpie Marker

Left-Overs Card

Happy Monday Everyone!

I hope you had a spectacular weekend!

If you recall over the weekend I shared the Sunflower & Watermelon Welcome Summer banner with you.  Well I had a few extra pieces left over that I wanted to use up so I created a fun left-overs card!


I chose a piece of Emerald/Emerald Starstruck foiled paper for the background and then layered on all of the extra bits I had left over. I die-cut the "hello" sentiment from a scrap of Ebony/Gold Glossy foiled paper.

Now I have a shimmery, sparklie fun card to share this summer.
Who knew left-overs could be so good!

Supplies:

Rinea Ebony/Gold Glossy Foiled Paper
Rinea Silver/Silver Starstruck Foiled Paper
Rinea Gold/Gold Glossy Foiled Paper
Rinea Ruby/Ruby Starstruck Foiled Paper
Rinea Fuchsia/Fuchsia Starstruck Foiled Paper
Rinea Emerald/Gold Glossy Foiled Paper
Rinea Mocha/Gold Glossy Foiled Paper
Sizzix - Watermelon & Sunflower Dies
My Favorite Things - "hello"
X-cut Banner Die

Sunflower & Watermelon...Welcome in Summer!!

I am so excited to welcome in summer with my project today but I am also excited because this is my first official post for the Rinea Design Team!  I think you're going to love this foiled paper!


And here it is....my Welcome Summer Banner!!  I die-cut both the inside and scalloped outside banner pieces then adhered them together. All of the components for the watermelons and sunflowers were then cut using sizzix dies and assembled accordingly. The letters were die cut from the Ebony/Gold Glossy Foiled Paper using an alphabet die set from My Favorite Things.  

All of the individual pieces were then glued to the individual banners and left to dry.  Once the glue had dried a hole was punched at each corner of the top of each banner and threaded onto a green/gold ribbon from May Arts.


For complete instructions please see: Welcome Summer Banner by Roni
So easy yet a stunning piece sure to draw oohs and aaahs from your guests this summer!


This month Rinea introduced the new Misfits Variety Pack...a mystery collection filled with both glossy and starstruck foiled papers in a variety of colors. A fun pack to get a taste of just how handy Rinea foiled paper is.


Another fun brand new variety pack is the Magical Foiled Paper Variety Pack! Perfect for all those Disney projects you've been putting off making!  Wait no more - these lovely foiled papers are reason enough to get them done!  I'll have a project to share with you later this month using this collection ;) 


Rinea Patriotic Foiled Paper Variety Pack
Rinea also released the Patriotic Foiled Paper Variety Pack! A lovely collection of the ole' red, white and blue! A perfect choice to show off your patriotism on cards, in scrapbooks, home decor, mixed media and more!!  Unlike the first two new variety packs, the Patriotic Foiled Paper Variety Pack is available for a limited time only. Once it's gone it won't be available again this year!!! I so can't wait to share the project I made using this collection!!

Supplies:

Rinea Ebony/Gold Glossy Foiled Paper
Rinea Silver/Silver Starstruck Foiled Paper
Rinea Gold/Gold Glossy Foiled Paper
Rinea Ruby/Ruby Starstruck Foiled Paper
Rinea Fuchsia/Fuchsia Starstruck Foiled Paper
Rinea Emerald/Gold Glossy Foiled Paper
Rinea Mocha/Gold Glossy Foiled Paper
May Arts - Ribbon
Sizzix - Watermelon & Sunflower Dies
My Favorite Things - Alpha Dies
X-cut Banner Die

Rinea 2018 - 2019 Design Team!!!

Image may contain: 12 people, people smiling, text

Woo Hoo...so excited :)
I can't wait to start sharing my creations with you all!