Showing posts with label home decor. Show all posts

Lavender - Imagine's Color of the Month!

Have you heard that Lavender is the color of the month for Imagine?  It is and I created these fun and smelly sachets!  Smelly in a good way though - filled with lavender collected from my garden.


These little gems were made with the help of Fabrico Dual Tip Fabric Markers.
For complete details be sure to check out the Imagine blog - 


Have a lovely day friends!

Give Something Away Day

Did you know that tomorrow is Give Something Away Day?  It is so I made these fun friendship stones to give-away...  I was inspired by the Kindness Rock movement...artists decorate rocks and leave them places for others to find. I thought I'd place a few around our town square to see if anyone finds them.


You can check out the Imagine blog post - 
for a supply list and instructions.


Star Spangled Patriotic Wreath

Are you ready to get your Red, White and Blue on?

I sure am with this fun and easy patriotic Star Spangled Wreath....


It's so easy to make using Rinea's Patriotic Foiled Paper Variety Pack, just cut out the stars, add score lines and pinch the star into a 3-D delight!  For complete instructions, please see my post on the Rinea blog here: 3-D Star Spangled Wreath by Roni.


A couple more close up images of those lovely stars....
don't ya just love that shine, shimmer and sparkle?


Made using the Limited Edition 

Rinea Patriotic Foiled Paper Variety Pack


Sunflower & Watermelon...Welcome in Summer!!

I am so excited to welcome in summer with my project today but I am also excited because this is my first official post for the Rinea Design Team!  I think you're going to love this foiled paper!


And here it is....my Welcome Summer Banner!!  I die-cut both the inside and scalloped outside banner pieces then adhered them together. All of the components for the watermelons and sunflowers were then cut using sizzix dies and assembled accordingly. The letters were die cut from the Ebony/Gold Glossy Foiled Paper using an alphabet die set from My Favorite Things.  

All of the individual pieces were then glued to the individual banners and left to dry.  Once the glue had dried a hole was punched at each corner of the top of each banner and threaded onto a green/gold ribbon from May Arts.


For complete instructions please see: Welcome Summer Banner by Roni
So easy yet a stunning piece sure to draw oohs and aaahs from your guests this summer!


This month Rinea introduced the new Misfits Variety Pack...a mystery collection filled with both glossy and starstruck foiled papers in a variety of colors. A fun pack to get a taste of just how handy Rinea foiled paper is.


Another fun brand new variety pack is the Magical Foiled Paper Variety Pack! Perfect for all those Disney projects you've been putting off making!  Wait no more - these lovely foiled papers are reason enough to get them done!  I'll have a project to share with you later this month using this collection ;) 


Rinea Patriotic Foiled Paper Variety Pack
Rinea also released the Patriotic Foiled Paper Variety Pack! A lovely collection of the ole' red, white and blue! A perfect choice to show off your patriotism on cards, in scrapbooks, home decor, mixed media and more!!  Unlike the first two new variety packs, the Patriotic Foiled Paper Variety Pack is available for a limited time only. Once it's gone it won't be available again this year!!! I so can't wait to share the project I made using this collection!!

Supplies:

Rinea Ebony/Gold Glossy Foiled Paper
Rinea Silver/Silver Starstruck Foiled Paper
Rinea Gold/Gold Glossy Foiled Paper
Rinea Ruby/Ruby Starstruck Foiled Paper
Rinea Fuchsia/Fuchsia Starstruck Foiled Paper
Rinea Emerald/Gold Glossy Foiled Paper
Rinea Mocha/Gold Glossy Foiled Paper
May Arts - Ribbon
Sizzix - Watermelon & Sunflower Dies
My Favorite Things - Alpha Dies
X-cut Banner Die

Faux Beach Glass Votive


Happy Monday! I hope you all had a great weekend.  Today I wanted to share my faux beach glass votive holder made from flattened marbles!   

The color of the month at Imagine is Sea Breeze and the inspiration photo brought to mind the lovely pieces of sea glass that has a subtle frost over the colors....  Well I decided to see if I can't take that inspiration and turn it into a lovely little votive.


If you would like to find out how this votive holder was made, please see the post:


Project Swap Part 2

Yesterday in part 1 of Project Swap I shared the card I made following Nadine's written instructions to see how closely the reproduction would be to the original.  Today in Part 2 of Project Swap I wanted to show you the project I made and show you how Nadine's project turned out!


I wanted to create a piece of art that I had originally planned on hanging in my kitchen but as it turned out it looked better in my bathroom.  The artwork is mounted on a 12x12 black canvas and really pops IRL.

Now I won't show you what Nadine created here...you'll need to jump on over to the blog and you'll be treated to a video of how she re-created my project!!


I hope you enjoy the project video, it's really fun to watch her walk through the entire process!  I hope we can do this again sometime.

DecoArt Pouring Medium

Hello Friends! 

I'm sure most of you have heard the chatter or seeing examples of one of the latest artsy trends...Paint Pouring. I have been resisting the urge to joining the fray but I could resist no longer. DecoArt has come out with Pouring Medium and Top Coat to make the process so easy.


These are my very first examples of my first attempts at this art form and I have to say that I am so pleased with the results and I couldn't have had more fun with the whole process.  But, I'll let you be the judge of my results...  Oh and I didn't add anything to mix...I simply used the DecoArt Pouring Medium and Acrylics.


I started off by gathering all of my supplies....a low profile cardboard "pizza box" to work in; cups to mix paints in and a larger pouring cup; wood stir sticks; DecoArt Media Fluid Acrylics, DecoArt Americana Titanium White Acrylic Paint; and of course the new DecoArt Pouring and Top Coat Mediums.

I wanted to try a variety of substrates so I used 2 different size stretched canvases from Canvas Corp., a flat canvas panel from Dick Blick and a 1.5" deep chipboard box that was in my stash. To help hold each piece off of the bottom of the box (so the paint didn't pool on the bottom of the canvas) I used push pins on the dimensional canvases and placed the panel on small cups.


Before I began I put the Pouring Medium into a squeeze bottle so I could better control the amount I used in each color.


I followed the recommended mixing formulas for each type of paint, in these examples - Fluid Acrylic 2:1 paint:medium; Craft Acrylic 1:1 paint:medium.  Since I had these handy little medicine cups I went with 5mL = 1 so the Fluid Acrylics I used 10mL of paint to 5mL of Pouring Medium and 5mL of Americana Acrylic paint to 5mL of Pouring Medium.


After I had everything measured out I stirred and blended the paint/medium thoroughly.  I've heard some people say that this step takes a long time. Personally I didn't think it took long at all - about 2 minutes or so. I did have my colors picked out ahead of time so maybe that's what takes them so long.


The first technique I wanted to try was a Cup, Flip or Dirty Pour (seems everyone has a different term they prefer) basically you layer all of your colors into a single cup then flip it over onto your canvas and let the paints/medium do it's thing.


So I layered in my paints...


then flipped the cup upside down onto the canvas panel.  I let the cup sit in this position for a couple minutes to let the paint migrate to the bottom.


And then...the magical moment - I lifted the cup and let it flow.  I tilted the canvas this way and that to help move the paint towards the edges.  I must point out that I used far less paint than most folks do. Why? Well, if you've visited here before you know I'm pretty frugal and don't let anything go to waste (more on this further along in the post).  

Up until last night I was under the assumption you HAD to use huge quantities of paint to make this type of art form. WRONG....I watched a few videos on it on YouTube and it wasn't until I happened upon a video from Myriam's Nature.  She actually did the math and measured out the paint she needed for the size of canvas she was working on.  Cool!!  I didn't do the math but I did a rough estimate and came pretty close so I had very little waste.


And here's how it turned out...at this point it's still drying but the pattern has pretty much set. The photo at the beginning of this post shows each of the finished canvases with the DecoArt Topcoat applied.


This example was made by pouring the paint from each mixing cup directly onto the canvas in side by side lines. I then tilted the canvas here and there until I liked what I saw.  


The third try was a bit of both of the first 2 techniques, initially I poured a bit of paint onto the canvas; moved it about then poured the light blue and yellow over the top of the already poured paint. The initial pour was starting to dry a bit so I picked up the canvas from one corner and banged it onto the work surface to create these cool breaks.  I LOVE the look...don't know if I'll be able to reproduce it or not but it will be fun to try!

Now you might wonder why you didn't see this in the first photo of this post...well, you have to have a bit of patients for this art - I got a bit anxious and touched this canvas right in the center before it was all the way dry....needless to say I messed it up good.  Soooo, you will need to leave your painted canvases to dry for a good while before you check them ;) 


My final example was made using the swipe technique. I scraped the paint out of each mixing cup and the pour cup onto the left hand side of this canvas. I then used a baby wipe to drag the paint across the canvas from left to right. After I had dragged the paint I let it dry at a 45 degree angle.  As you can see it created a really cool pattern as the paint slid downhill.  It is still wet here which is why the photo is sideways...I didn't want to attempt to move it after the fiasco with the other canvas.


Finally, remember I said I hated to waste paint...well I moved each canvas from the box I poured in and picked up the "run off" paint with the baby wipe from the swipe technique and swiped it across a piece of cardstock!!  It turned out amazing, I can't wait to use it on some cards.

All in all this was SOOOO much fun! I loved it.  I will be doing many more "pours" and can't wait to share them with you.

So, what do you think???


Supplies:
DecoArt-
Pouring Medium
Pouring Top Coat
Media Fluid Acrylics - Primary Yellow, Primary Cyan, Yellow Green Light, Cobalt Teal Hue
Americana Acrylic Paint - Titanium White
Canvas Corp - 4x4x2"; 5x5x1 canvas
Dick Blick - 8x10 canvas covered panel
Unknown - 5x7x1.5 Chipboard Box
Push Pins, Measuring Cups, Pour Cup, Wood Stir Sticks, Pizza Box (to work in)

Rainbow Pinwheel Wreath!


Check out my new wreath I made to welcome in Spring/Summer!
It was made from white cardstock, stamps from Rubber Stamp Tapestry and VersaMagic Inks!!

Complete instructions and supply list can be found here:


Easter Bunny Plaque

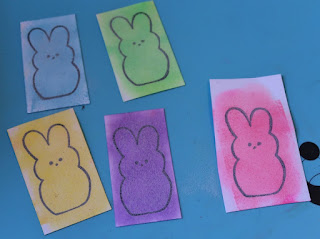
Hello Friends!  I wanted to make a little plaque for Easter and I had this darling Marshmallow Bunny stamp from Just For Fun Rubber Stamps!


Here's how I made it....


I started off by cutting the basic plaque shape from a piece of chipboard.


Inked it up a bit and stamped the sentiment on the top.


Next I sponged Radiant Neon ink on cards,


Stamped the image with VersaFine Clair Nocturne (Black)


Embossed and cut them out.


I knew I wanted a bit of grass for the bunnies to hide in so I cut up some paper grass that I then glued to a strip of foam board.


Added bunnies to the card with double stick foam tape, 


Trimmed up the grass 


Added it to the plaque and finished it off with a few flowers and paper twine.


Ready to greet guests!

Supplies:

Imagine: Radiant Neon Ink - Electric Blue, Electric Yellow, Electric Purple, Electric Green, Electric Pink; VersaFine Clair - Nocturne, Acorn; Memento - Rich Cocoa; Embossing Powder; irRESISTible Pico Embellisher - Wedding Dress; Tear It! Tape; On Point Glue
Just For Fun Rubber Stamps - Marshmallow Bunnies
Prima Marketing - Flowers
Chipboard, Foam Board, Double Stick Foam Tape, Paper Twine; Easter Grass

Seth Apter Baked Texture Embossing Powders

Hi Friends!  I am so excited to be able to share a project I made using Seth Apter's new embossing powders - Baked Texture.  If you've not seen them before you're in for a treat. He partnered with a Canadian company - Emerald Creek to bring his creations to reality.  These powders are NOTHING like any powders you have sitting in the back of your craft drawer.  These are a whole new way to envision embossing and I love 'em!!  I have loved embossing from the get go when I first discovered stamping but was saddened that it fell out of favor.  I am hoping this will help bring embossing back in a big way!


This is a piece of wall art I made using each one of the different powders available at this time....I was going to add a die-cut or sentiment on it but I sort of like how it looks as is.  I'm going to leave it as is for now.

Note: all examples were made using VersaMark Ink by Imagine.


Deep Sea...a lovely mix of chunky clear and blue powders - the more layers you add the less you see the clear and it turns into a deep rich blue - you can see how it varies from the speckled white to the darker areas which comes with each additional layer of powder.


This is probably my favorite...Chunky Rust.  It has tiny little flocking hairs mixed in with a copper color powder. It is AMAZING!!!  It really looks like rust  - the area on the example near the lid is just a single layer of the powder, the center and right has multiple layers of the powder.  The more you add the thicker and rusty-er it looks!


Vintage Beeswax...it really does look like beeswax!  Thinner layers is just a touch of yellow in the mix...thicker colors like on the text really get the lovely warm yellow which can be cracked just like UTEE (Ultra Thick Embossing Enamel). 

NOTE: This ep finishes with a very shiny surface (unlike beeswax), to give it the authentic look SA recommends applying a layer of matte multi-medium over the surface.  I have an easier fix, just take an eraser and rub it over the surface of the cool embossed area!  It takes the shine right off (you can see it in one of the examples below.  This technique will take the shine off any glossy embossing.


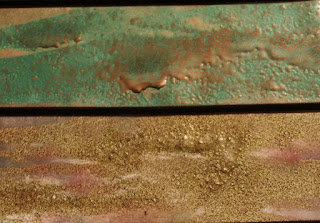
Patina Oxide - Super cool green and copper mix...the more you add, the more mixed it will look.  Very pretty.


Dirty Sand - Stuff is really cool, it does feel like sand when it's cooled. It has a rough gritty texture that is going to be so cool on beach and outdoor themed projects.


Rocky Road - I think this is my 2nd favorite - this stuff is wicked cool...really chunky, textured finish - if you want.  You can melt it a lot to get it all smooth and glossy or add a 2nd or 3rd layer leaving those less melted to create lots of texture.


Ancient Amber - this is a very pretty tarnished gold effect...less powder is amber more powder is gold.  Lots of possibilities.


Once my strips were finished I decided to turn them into art...I sponged on VersaFine Clair Morning Mist (a soft grey) over the white areas to really make the embossing stand out.


Then mounted them to a canvas using Creative Medium.  I had sponged the canvas with a trio of browns and copper but when I adhered the embossed strips to the canvas it looked muddled so I used some dark brown velvet ribbon to cover it up and add a bit of definition between each piece.  Turned out much better.


I wanted to share the following photos to show the texture of the various powders for you to enjoy...


This is the photo that shows the "matte" beeswax after it had been rubbed with an eraser.  It started out just as glossy as the Deep Sea ep below it. Quite a difference don't you think?


Top to bottom: Patina Oxide; Dirty Sand; Vintage Beeswax; 
Deep Sea; Ancient Amber; Rocky Road and Chunky Rust

Over all I have to say that these powders are well worth the asking price. These powders are nothing like anything you've ever thought of in an embossing powder. My only hope is that Mr. Apter brings out more of these fun powders in the future!  I'll be first in line to place my order!

Supplies:

Seth Apter Embossing Powder
Imagine - VersaMark Ink; VersaFine Clair, Tear It! Tape; Creative Medium, Sponge Dauber
Canvas Corp - 6x12 Natural Canvas
White Cardstock