Showing posts with label challenge. Show all posts

Not My Monkey....

The current challenge on the Lost Coast Designs blog is
"No Body Here"
translated...no humans allowed!

I am so excited to share this card with you...
I have been bursting with excitement ever since I made it! 


I stamped the monkey face onto a piece of white cardstock and he was masked over.  I then wrote over and over "That moment you realize this is your circus and these are your monkies." on the background.  I stamped the "Not My Circus" sentiment several times over the writing then removed the mask.  

I then set about coloring him with Prismacolor colored pencils and I extended his hair a bit with the colored pencils just to give him a bit of a frazzled look...how I feel sometimes  - LOL!!  

I have to say I am so pleased with how cool he turned out! 
That look on his face is priceless!  

I hope you'll join us for the
No Body Here Challenge!

Squeeze the Day!

Happy Day Friends!

It's time to squeeze the day ;)  LOL!!


This weeks challenge over at the Just Us Girls Challenge blog is Citrus.
It just so happens that I have a brand new set of stamps from Rubber Stamp Tapestry that fits the bill perfectly... Fresh Lemonade and a sentiment from the set - Whispers from the Garden.


To create the card I started by stamping the flower as a base for each cluster. I then stamped the lemons and limes, filled in with the large leaf bunch. I made a little lemon mask and then stamped the small leaf cluster here and there using the mask over the adjoining lemon/limes. 
Easy peasy, lemon squeezey!  (sorry, couldn't resist!)


What do you think?

Makes me thirsty for a Lemon Shake-Up!  I've been experimenting lately...I made a Strawberry Lemon Shake-Up the other day and it was exquisite!  I'm thinkin' it's time to try a Lemon-Blueberry Shake-Up?!?!

I was having so much citrus fun I decided to make another card....


I started off by tracing an oval onto the card.  I stamped along the left side then added a bit of watercolor along the right side.  After it had dried I stamped the sentiment, trimmed & mounted it toa green card base.

Have a sweet day!


Supplies:

Rubber Stamp Tapestry - Fresh Lemonade, Whispers from the Garden
Imagine - VersaFine Clair Inks
Cardstock
MFT - Banner Dies

B is for Butterfly!

Hello Friends - I have been playing with my Marabu Art Crayons again experimenting with backgrounds. Today I wanted to share the card I made using one of those experiments...  I also made this card for the current challenge over on the Lost Coast Designs/Carmen's Veranda which is... #56 I Spy...Things That Start With "B".

Stamps: Lost Coast Designs - Butterfly Set, Art Wings Sentiment

Since I knew I wanted to make a butterfly card I wanted a background that would mimic the light and shadows you see where butterflies play...in among the foliage in the garden. Here's what I did...

I started off with a piece of white cardstock that was a bit larger than the actual size of the card panel I wanted to use.  

I started off by scribbling Sunshine Yellow in scattered areas over the panel. 

Next I came in with Kiwi then Apple (both greens) and finally just a hint of Turquoise.  

As I mentioned I was experimenting so initially I tried to blend it all together with first a sponge dauber then a baby wipe but it just didn't give me the look I was going for - it ended up being just a big green blob.  Into the ??? pile.

So then I started over layering the colors in the same fashion but then I blended the colors gently with my finger tip and it looked pretty good.  

Next I took a crazy net looking stencil and placed it over one corner for a test to see if I could pick up some of the color to give lighter and darker areas.  It worked perfectly so I continued to pick up color in just small areas to create a random pattern rather than the exact stencil image. I was able to pull up some of the greens leaving the lighter green and yellows behind to give the exact look I wanted.


I am so happy with how it turned out...that's what I love about experimenting.  I also have several other "experiments" that I can use on other projects or maybe even a few Artist Trading Coins!

Hope this inspires you to pull out your watercolor crayon medium and give it a go.  And if you're so inclined it would be awesome if you would join in the fun over on the Creative Portal and share your "B" inspired card!


Image may contain: 1 person, text

Challenge #56 - I Spy Things That Start with "B"

Supplies:

Lost Coast Designs - Butterfly Set, Art Wings to Fly
Imagine - VersaFine Clair Nocturne
Marabu - Art Crayons
Stencil
Double Stick Foam Adhesive
Green Card Blank

Watercolor Cotton Card

Hope all of my USA friends had a nice holiday yesterday.  It was a scorcher but we all made it through.

I have been wanting the cotton set of stamps from Altenew since they came out.  Well I finally got them and couldn't wait to play...


We were recently down in Alabama and got to see real cotton in the fields. I was able to purchase a couple stalks of cotton at a flea mall (that's what they call them down there...that's a whole nother story) and they are in a vase on my kitchen table.  I love it...it's so organic, just beautiful.

So I saw that this weeks challenge at  CAS on Friday/Sunday (it's called both for some reason) is #136 Watercolor so I thought I'd give it a go.


The "frame" around part of the cotton was just a swish of water then a bit of color added.  So easy yet very striking don't you think?

Supplies:
Altenew - Cotton Stamps
Watercolor Paper
Imagine - VersaFine Clair - Acorn & Nocturne
Prima - Watercolor Confections
Niji Waterbrush

JFF Challenge - Red White & Blue!

The start of the month always brings lots of fun challenges and this month the challenge for the JFF Blog is Red, White and Blue!  Always a fun theme, especially this time of the year.


And this is the card I created!!
I got special permission to use this card because the eagle is one of the new stamps from JFF Stamps Summer release.  It's not available on their web-site yet but it will be soon.

The red, white and blue banner was created by stamping the stars & stripes image from the Patriotic Block side by side until it was just the right width for the card.  It was then colored using Memento Dual Tip Markers.

Finally I stamped the Home of the Brave sentiment on white cardstock, matted it with black and mounted it to the card.

As it turns out this card will also fit into the Twinkle Twinkle challenge 
over at Cards in Envy challenge this month!


Circles Circles Circles!

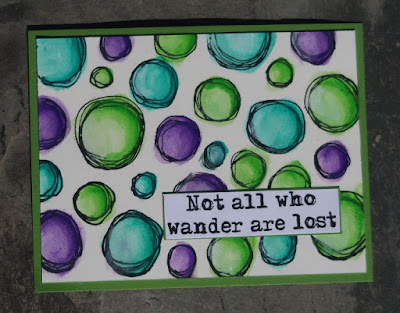
Welcome, welcome! I am so excited to share my circle card with you today.  The newest challenge over on the Lost Coast Portal is Round and Round.  I thought this circle stamp was PERFECT for the challenge!


I was so excited because I was able to use my new to me Marabu Art Crayons to color it.  I'm sure you've heard me talk about them but I just have to say they are so much fun to play with!

Anyway, to see how easy this card was to create, hop on over the LCD blog and check it out....

Lost In Circles?

Challenge #55 - Round and Round

Image may contain: 1 person

And be sure to join in on the fun and enter your own card into the Round and Round Challenge for your chance to win $'s to the Lost Coast Design / Carmen's Veranda Rubber Stamps! You can't win if you don't enter!

CSI Case File No. 256

Hello Friends! 

This month the Imagine Artist Team is joining up with CSI Challenge blog to share a bit of inspiration. I was assigned case file #256 to try to solve the case (shown below) and this is what I came up with...


I was so excited about this as I had the perfect stamps to go with "The Scene" and since we like to travel so I thought the inspiration was the perfect way to celebrate how we "camp" on road trips!  You see, our idea of camping is the Holiday Inn, Marriott, Hampton Inn and Suites, etc.  The photos are from a trip earlier this year when we had to stop in Harrisburg/Hershey area during a pop up snowstorm. We lucked out and got the last room available at Spring Hill Suites and it was beautiful to boot!   


My inspiration from Case File No. 256 was "The Scene", Colors, Banners and more.  


These stamps from Just For Fun Stamps went with the theme perfectly!!


And I had this Club Scrap "Road Trip" stamp that worked out so well...
I also used a map and travel sign stamps to create various background pieces as well...


Hope this inspires you to pull out your stamps, inks and photos to scrap your travels.

Supplies:
Imagine - VersaFine Clair - Nocturne, Cheerful, Tulip Red, Warm Breeze; Memento Dual Tip Markers
MFT - Banner Die
Just For Fun Rubber Stamps - Camper 1, Camper 2, Wash Tree, Campfire
Club Scrap - Vintage Travel Stamps, Washi Tape, Cardstock


Little Birdie Hello!

Happy Day Friends!  
I hope you're all having a smashing week!  
Today I wanted to share my little bird card with you....


I created this for the Challenge #53 - Tweet This.  I am just so tickled with how this card turned out...the background was so much fun to make.  To see how I did it, hop on over to the LCD blog....


And there is still time to enter the challenge...


Hope you join in on the fun!  
You might just win $'s for your own LCD & CV stamps!!

Tweet This

It's the 15th, that means that there is a new challenge over on the 
Lost Coast Designs / Carmen's Veranda blog!!

And that challenge is... Tweet This!


We want to see your bird creations!!
Be sure to post a link to your new bird themed card on the blog to be entered to win!!
Good Luck Everyone!

Yellow & Orange Challenge!

Happy May Day Everyone! 

Today I wanted to share the new challenge on the Lost Coast Designs & Carmen's Veranda - Yellow and Orange!  Yes, you must use yellow and orange somewhere on your creation and do I have a card for you....


a Weinermobile!!!!

I absolutely love this image...it brought back so many memories. My family and I actually got to see a real Weinermobile when we visited The Henry Ford Museum when the boys were young.  I even got a Weinee Whistle (and I still have it).  

So on to the card... I started off by trimming a cover from a vintage atlas down to size. It was spitzed with water and then sprinkled with yellow Nuance pigment powder. After it had dried I rubbed a bit of orange and yellow VFC ink through a circle stencil.  I then smeared a bit of Radiant Neon Amplify! through a second stencil as well. I removed the stencil and heated the Amplify! to puff it up. This panel was affixed to a white card base and I added a few hand drawn lines around the outer edge.

I stamped the Weinermobile twice on white cardstock.  The first was sprinkled with orange Nuance and the second I watercolored the car with yellow Nuance.  Once they were both dry I trimmed the  orange weiner and added it to the yellow car body.  It was then affixed to the card using double stick foam tape.

I die-cut the sentiment and added a few sequins to finish it off.

Now it's your turn!!

No automatic alt text available.

Be sure to check out the other cool Yellow and Orange creations
and 
enter your own piece to win fun stamps from 
Lost Coast Designs & Carmen's Veranda!!

I would also like to enter this into the Verve Challenge - YELLOW!!


as well as Country View Challenge - Be Humorous.

Country View Challenges

Supplies:
Imagine - VersaFine Clair Nocturne, Radiant Neon Amplify! - Neon Yellow
Nuance Pigment Powders
Die-Cut, Vintage Map Page, Sequins, Cardstock

Bottle Cap Art Doll

I have another inspiring creation for the Lost Coast Design & Carmen's Veranda challenge - Stamped Backgrounds!


Isn't she great?
Hope on over to the LCD/CV Blog to check out how she was made...


Image may contain: text

Don't forget, today is the last day to enter the Stamped Background challenge!!
You don't want to miss out on your chance for free stamps.

CAS: Bubbles!

I hope you're all surviving this Spring
 that seems like the never ending Winter! 

I was looking through some of my challenge emails yesterday and found the Bubbles challenge from Addicted to CAS.  It was the perfect opportunity to use a new (to me) stamp set from Hero Arts...the Color Layering Octopus!  It actually came out last year but I just discovered it recently when I was looking for a different stamp set.  The moment I saw it I knew I had to have it!


Isn't he so stinkin' cute?  I just love him and his little fishy friend!  The entire card was stamped using VersaFine Clair inks - I started off by stamping the base layer of the octopus with Verdant and layered Green Oasis over top.  I used Warm Breeze for the bubbles, Nocturne for the sentiment and finally Summertime (isn't that a great name?) for his little friend.


Here's a close up of the octopus...such fun!
I can't wait to stamp him in other colors...so many ideas :)


Supplies:

Hero Arts - Color Layering Octopus
Imagine - VersaFine Clair - Verdant, Green Oasis, Warm Breeze, Summertime, Nocturne
White Cardstock Card blank

Yeah! House of Cards Top 5!

Our Next 5 Faves

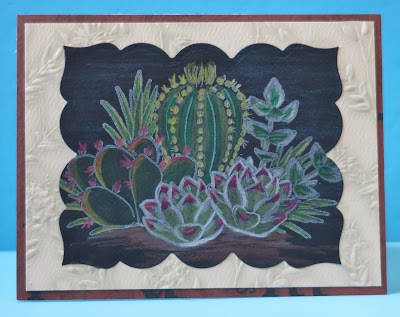
What fun, my card below was chosen as one of the top 5 for Marches challenge...
Colored Pencils on Black or Dark Cardstock.


Stamps - Rubber Stamp Tapestry
Imagine - white ink
colored pencils
Club Scrap - Cardstock

Lost Coast Designs & Carmen's Veranda - Stamped Background Challenge!

Hello my ink stained friends!  I have some exciting new to share with you today...I have been chosen to be on the design team for Lost Coast Designs & Carmen's Veranda!!  I am very excited about this - I have admired these stamps for a very long time, they are very artsy and work well not only on cards but in mixed media arts and collage too!  I can't wait to share my creations with you, I have been having lots of fun with them.

Every 2 weeks LCD/CV hosts a new challenge...my first piece I get to share with you was inspired by their new challenge - Stamped Backgrounds.


I started off by stamping the Pencils Background onto a piece of white cardstock using VersaFine Clair Nocturne ink. Each pencil was colored using a variety of watercolor and colored pencils. This was mounted on a blue card blank.

The next layer is a piece of self adhesive vellum that was colored with Nuance pigment powder. 

Georges and Lewis was stamped once in VF Clair Nocturne and a second time with Paradise blue VFC ink.  The shirt was trimmed from the second image and affixed to the first.  I stamped an extra pencil with green, brown, grey and pink ink which was trimmed and pieced back together to create the pencil which I tucked under his arm.  He was affixed to the card panel using double stick foam tape.

Finally I die-cut the sentiment and inked it with a bit of the Paradise ink.


I hope you hop on over to the blog to check out the other inspiring creations and possibly enter one of your own for your chance to win $$$ to acquire your own Lost Coast Designs & Carmen's Veranda stamps!

Supplies:

Imagine - VersaFine Clair - Nocturne, Paradise, Rain Forest, Morning Mist, Acorn, Charming Pink, Sponge Dauber
Die-Cut, Vellum, Cardstock

Pretty as a Picture Challenge

Lost Coast Designs and Carmen's Veranda's second challenge for the month is Pretty as a Picture (see the inspiration photo at the bottom)!  I decided to play along and this is what I created...


I was inspired initially by the birds nest but then as I looked at it again I was also struck by the colors...vintage barn red, the blue from the eggs and the stark white of the freshly painted trim.  How could I resist.

I started off by cutting a piece of cardstock 4.25 x 5.5" and ran it through a wood grain embossing folder.  I colored the panel using 3 different Nuance reds plus a bit of grey/black.  I then swiped a white ink pad over the raised areas and immediately smudged it around just to give it a weathered feel. I sponged Acorn and Fallen Leaves VersaFine Clair ink around the edges.

I stamped one of birds from the Three Birds stamp set on white cardstock using Paradise blue VFC which was then fussy cut.  I twisted twine into a loopy birds next and stapled it onto the panel. Finally I die-cut a few branches which were sponged with brown ink added them to the card and finished it off with a few white flowers.

My rendition of Pretty as a Picture!


Supplies:
Lost Coast Designs - Three Birds
Imagine - VersaFine Clair - Paradise, Acorn, Fallen Leaves; irRESISTible Pico Embellisher - Electric Blue; Memento Luxe - White; Sponge Dauber
Nuance Pigment Powders
Sizzix Die/Embossing Folder


Take It Challenge Rollagraph #1

Happy Friday! 
It's been quite a week here...
hope yours has been great!  

Today I wanted to share a fun new challenge that I thought I'd bring back. Quite a few years ago I held a challenge where I sent out the same materials to several people and they created a card or other project with the materials and shared the image with me.  I then shared all of the projects on one post showing what everyone came up with.  

Well recently I was able to purchase NOS Rollagraph stamps and there were a few wheels that had several duplicates. I am going to sell some of the dups on my Etsy store but I thought I'd share  some with you as well!


NOTE: I have the 7 participants for this round of Take It Challenge! Thanks to all who volunteered, if you haven't already send me your snail mail addy please do so and I'll get your stamps out to you.  If you didn't get in this round, no worries...I will have another soon!

So here's what I'm going to do...I'm going to send out the Flagstone Rollagraph stamp out to 7 people. Once rec'd you will create a project incorporating the stamp into your design, send me a photo of the finished design within 2 weeks then I will post all of your creations along with one of my own all together to reveal the results.  

So who's up for a challenge?  You'll have approx. 2.5 weeks to complete your project (I'll give you the exact date once the stamps have been sent.).  You don't have to pay anything, I'm going to cover the cost of the rubber stamp and postage myself. I'll take the first 7 people who are interested.  Please either post here or e-mail me at ronijj @ gmail . com (no spaces of course).  I will need your snail mail addy as well so I can send out your stamp to you.

If all goes well we will have another Take It Challenge in May and possibly beyond :)

Take It Challenge - Rollagraph #1 Participants:

1. Ionabunny

2. SusanK

3. Erin

4. Tonya

5. Cindy 

6. Theresa

7. SusanP

As you will notice in the photo above the stamp has been removed from the wheel.  If you prefer to have your stamp sent on the wheel, plmk.  IMO it's cheaper to send and easier to store off the wheel.  In fact, I have removed all of my rollagraph stamps from the wheels and store them in a single box...


This is one 8.5 x 11 x 2" box! It has approx. 75 stamps so far and can hold loads more.  
FAR less room than trying to store all of the stamp wheels. 


And here is how I keep track of what I have...they are arranged by theme.  I mark the stamp name and number on the back of the rubber and they are stored in sequential order so I can look for my design in the book and locate it quickly and easily in the box.  If I have a wheel that doesn't have a number on it I assign one randomly.


Spring Flowers Challenge

Hello Friends!

I hope you're having a good day today. 
I wanted to share the new April challenge over on 

I wanted to share a few...o.k. several flower cards with you...


Hope you stop by and give it a try!

Supplies:

Just For Fun Rubber Stamps - all images n sentiments
Imagine - Memento Dye Inks, Memento Dual Tip Markers, VersaMark, Clear Embossing Powder, On Point Glue, irREISTible Pico Embellisher, Sponge Daubers
Kuretake Watercolor Paints 
Niji Watercolor Brush

Princess of Everything!

Just playin' around with one of my stamps I haven't used in a while...Princess of Everything!  Isn't she great? 


The card is assembled using an old bingo card that I swished around some watercolor paint, the white piece in the lower right corner was made by sprinkling on a bit of Nuance powdered pigments on watercolor.   After I stuck them down to the card I flicked on a bit of blue watercolor paint.  

The little princess was stamped with VersaFine Clair Nocturne ink and then colored with Prismacolor colored pencils.   I fussy cut her then pop dotted her onto the card.  The sentiment which is actually below the image when stamped was cut, glued then outlined.

I added the sparklie washi tape to the side just for an extra bit of bling.  You can't see it in this photo very well but her pinafore has a bit of micro fine glitter along the edges as well.

This card fits into the challenge over on Lost Coast Portal to Creativity's challenge: Say What??


Supplies:

Lost Coast Designs - Princess of Everything
Imagine - VersaFine Clair - Nocturne; On Point Glue; Tear It Tape
Nuance Pigment Powders
Prima - Watercolor Paints
Prismacolor Colored Pencils
Washi Tape 
Vintage Bingo Card

Succulents

Hello friends...I hope you're having an inky day!

Today I have 3 totally different projects featuring one stamp set - Succulents by Rubber Stamp Tapestry.


My first project uses a canvas I made using yesterdays technique of pairing pigment powders ~ in this case Lindy's Magical Shakers ~ with white glue.  The succulents were masked & stamped then colored with Chameleon Markers and fussy cut.


My next project is this fun "congrats" card I made using the hen from the set.  I stamped the succulent with VersaFine Clair Nocturne (black) then stamped a circle of color over each image (Verdant and Chianti VFC).  I added the little dots using a peg stamp then added the die-cut sentiment.


I had lots of fun with the final card.  I stamped/masked the succulents with white ink on black cardstock. I then colored the succulents with a fun set of colored pencils from Crayola designed to work on dark cardstock.  There are so very pretty metallics and shimmery colors in this set.  I was totally surprised, it is NOT what I was expecting from Crayola but boy did these pencils deliver.  

As luck would have it this months challenge at House of Cards is to use colored pencils on dark cardstock!  I'm happy to enter this card into their challenge.


Image result for design hues pencils

Supplies:

Rubber Stamp Tapestry - Succulents
Imagine - VersaFine Clair, Memento Luxe
Lindy's Magical Shakers
Crayola - Colored Pencils
Club Scrap - Cardstock
Canvas
White Glue
MFT - Die-Cuts