Showing posts with label Peg Stamps. Show all posts

Ocean Babies

Playin' with some new peg stamps today...Ocean Babies!

These little devils are so cute, they make really fun cards...


Having fun mixing up colors with a blue octopus baby, a green lobster, pink whale and orange seahorses which isn't really a stretch since some of them are on the orange side.  I almost never use orange but I really wanted to do something a bit different.  I think it turned out pretty good.


A fun underwater scene.  All of the foliage & coral are different peg stamps just arranged unexpectedly. 


Pairs of babies...the background is a lovely 

Supplies:
Rubber Stamp Tapestry - Ocean Babies, Whispers from the Garden 
Imagine - VersaFine Clair, Memento Dye Inks, VersaMagic (chalk ink), Sheer Shimmer Spritz - Sparkle
Rinea - Turquoise/Turquoise Starstruck Foiled Paper
Sizzix - Sentiment Dies
Cardstock
Twine

Stampin' Trees

Hello Friends!  I hope you're all doing well today.  I know many of you have been battling a late winter snow storm - I hope you're all safe and snug wherever you are.

Today I wanted to share a couple of cards I made today using the UM stamp set - Trees from Rubber Stamps Tapestry.


The first card was made for my sweetie...  I stamped the bare tree using VersaFine Clair Pinecone.  I then used a peg stamp that is called "Heart Dust" (isn't that darling?) to stamp the VersaFine Clair ink colors Glamorous (deep pink), Tulip Red and Charming Pink (bright pink)  VersaFine Clair.  You won't believe what I used for the grass...a Pineapple Top! It worked like a charm :)


This is a more traditional spring tree filled with lovely flowers and a sprinkling of flowers beneath as well.  A picture I'm sure we're all ready for!  The background for this card was stamped with a tri-flower stamp using VersaMark ink.

Supplies:

Rubber Stamp Tapestry - Trees UM set; Heart Dust, Pineapple Top, Oak Leaf, Flowers Three Ripply, Cherry Blossoms
Imagine - VersaFine Clair - Pinecone, Acorn, Tulip Red, Glamorous, Charming Pink, Verdant, Green Oasis, Golden Meadow, Blue Belle; VersaMark
Club Scrap - cardstock
Altenew - Painted Greetings
MFT - Stitched Dies

Succulents

Hello friends...I hope you're having an inky day!

Today I have 3 totally different projects featuring one stamp set - Succulents by Rubber Stamp Tapestry.


My first project uses a canvas I made using yesterdays technique of pairing pigment powders ~ in this case Lindy's Magical Shakers ~ with white glue.  The succulents were masked & stamped then colored with Chameleon Markers and fussy cut.


My next project is this fun "congrats" card I made using the hen from the set.  I stamped the succulent with VersaFine Clair Nocturne (black) then stamped a circle of color over each image (Verdant and Chianti VFC).  I added the little dots using a peg stamp then added the die-cut sentiment.


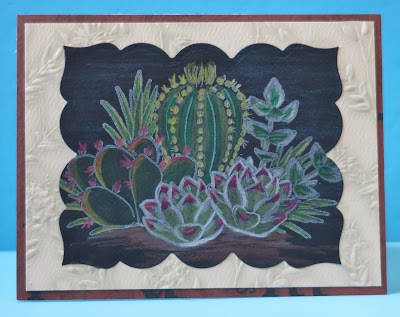
I had lots of fun with the final card.  I stamped/masked the succulents with white ink on black cardstock. I then colored the succulents with a fun set of colored pencils from Crayola designed to work on dark cardstock.  There are so very pretty metallics and shimmery colors in this set.  I was totally surprised, it is NOT what I was expecting from Crayola but boy did these pencils deliver.  

As luck would have it this months challenge at House of Cards is to use colored pencils on dark cardstock!  I'm happy to enter this card into their challenge.


Image result for design hues pencils

Supplies:

Rubber Stamp Tapestry - Succulents
Imagine - VersaFine Clair, Memento Luxe
Lindy's Magical Shakers
Crayola - Colored Pencils
Club Scrap - Cardstock
Canvas
White Glue
MFT - Die-Cuts

Still Winter...

Well, I should know not to get in a hurry for Spring here in Indiana...I was hoping that we were done with the snow but alas today those darn little flakes are falling again!  So rather than complain (more than I already have) I thought I might as well join 'em!

Stamps: Rubber Stamp Tapestry - Woods in Winter
Paper Smooches - Hello from Scripty Sayings

My first card was made by pouncing Fresh Greens Kaliedacolor ink pad on my craft mat and spritzing with Ink Potion No. 9.  I smooshed the cardstock into the ink and picked up the smaller bits over and over to give a really pretty layered depth to the greens.  I stamped the tree with a combo of VersaFine Clair (Rain Forest) and Rich Cocoa Dual Tip Marker (on the tree trunk).  I then stamped the birds again with VFC - Red Tulip and the "Hello" sentiment with VFC Nocturn.  I then stenciled on the falling snow with gesso and smeared a bit more along the bottom of the panel free-hand.

Stamps: Rubber Stamp Tapestry - Woods in Winter (pine trees);
Budding Spring (rabbit)

This card was lots of fun...I love making winter pine forests - they always turn out so pretty!  The pines were stamped using VF Clair - Morning Mist (grey), Twilight (grey blue) and Rain Forest (dark green).  The sky is a blend of blues & purples applied with a sponge dauber then misted with Mister Huey's Opaque White spray.   I stamped the bunny then sponged on a bit of pink on his ears and grey on his fur coat.

Stamps: Rubber Stamp Tapestry Woodland Harvest (Tree);
 Woods in Winter (birds); various Peg Stamps - flowers, grass, snowman, snowflakes, etc.

My final card was made in hopes that we could move along from Winter snow and cold into Spring!  I am so ready for a bit of color ~ other than brown (grass, trees, etc) to green on the grass, trees and maybe even some flowers to oooh and ahhh over!  


So what season are you currently experiencing?
Has Spring sprung in your neck of the woods or are you still "enjoying" winter?

A bit of Autumn Glory

Hello Friends...I hope you're all having an inky day.  Today I have a trio of cards bringing in some Autumn Glory using Rubber Stamp Tapestry set Autumn Glory Chrysanthemums!  I wanted to play with color on these cards sticking with orange, gold, rhubarb and grape jelly for my flower colors...and this is what I came up with...


My first card I also wanted to incorporate a sentiment background so I stamped the main sentiment and stamped a second sentiment with VersaMark ink - it just adds a hint of the message in block lettering.  


For this card I wanted to create a cascade of mums.  I love the look don't you?  I was brave and stamped the sentiment in orange...something I almost never do.  Orange is so bright but it works well with the flowers.


My final card was made in layers...I stamped and fussy cut tiny little masks for the flowers and stamped and layered and stamped some more.  I love the finished stamped flowers framed by the green card.  The delicate pattern on the green really accentuates the foliage on the stamped portion.

Hope you've enjoyed these cards and they inspire you to get inky!
Ink on my friends, Ink on!

Supplies:

Rubber Stamp Tapestry - Autumn Glory Chrysanthemums
Imagine - Memento Dye Ink, VersaFine, VersaMark
Club Scrap - Cardstock, Happy Birthday sentiment, Ribbon
MFT - Dies
Other - Faux Gemstones


Sweet Song of Spring...

Happy Friday!  Today I wanted to share some fun I had recently with Rubber Stamp Tapestry's new stamp set Sweet Song of Spring.  I was so inspired by this set of stamps that I decided to create little scenes by incorporating a bit of free-hand drawing and watercolor painting with the stamps...here's what I came up with...


My first card I made this little home for the Spring robin...I wanted to give him a nice secluded home in a secret garden to live. All of the flowers and foliage were stamped using VersaFine Clair then embossed with clear EP.  The bird was stamped using VersaFine ink and I drew the birdhouse and pole in free-hand.  The remainder of the image was watercolored using Kuretake Watercolor.  The sentiment is from Club Scrap.


This card is my attempt at a clean and simple watercolor card...not sure if it fits the "C&S" police term but it's pretty simple for me.  I started off by penciling in the mailbox to give myself a rough idea on where to add the foliage.  Next I stamped the greenery and added the flowers with VersaFine Clair inks.  I then went back and watercolored the mailbox and pole.  The final step was adding the sentiment (Club Scrap).   I messed up though - I wanted to sit the bird on top of the mailbox but my proportions were off and he looked like a giant next to the mailbox so I left him off ;)  LOL!!

Supplies:

Rubber Stamp Tapestry - Sweet Song of Spring
Imagine - VersaFine Clair
Kuretake Watercolors
Club Scrap - Sentiments

Geranium Magic

Have you seen 2 of the newest sets of stamps over at Rubber Stamp Tapestry?  They are themed around geraniums!! Cottage GeraniumRed Geranium -  I just love these sets.  Geraniums are some of the first flowering plants I can remember aside from violets.  My grandma had a small nursery/greenhouse and these were always a favorite.  Here's what I made...


The first card was stamped and embossed using Imagine's VersaFine Clair. I was able to stamp the entire piece then emboss in one fell swoop - no stamp emboss, stamp emboss, etc.  This ink is just amazing!  All stamps are from the Red Geranium set.


This is a combination of both geranium sets along with a tiny single flower from my stash...  It just needed that little pop of red don't you think?  Inks are a combo of Memento  & VFC.  


This card was so much fun.  I had a piece of cardstock laying on my desk that had 2 holes cut out of it from a previous project.  I used that piece of cardstock as a stencil to stamp through.  All of the inks were VersaFine Clair that was stamped and embossed.  Simply stamp through the stencil, move the stencil and stamp some more.  Once all the stamping was done, embossed using a clear EP.  I wish you could see it in person...the colors are stunning.  I know blue isn't the usual color for geraniums but I thought it worked out well.


My final card was made using the Cottage Geranium set...the bucket I planted my geraniums in is also a RST stamp.


Supplies:

Rubber Stamp Tapestry - Cottage Geranium, Red Geranium
Imagine: Memento Dye Ink; VersaFine Clair Ink; Clear Embossing Powder
Club Scrap.com - Sentiments
Cardstock
MFT Dies

Giddyup Cowboy!

Today I wanted to share some fun cards made using Rubber Stamp Tapestry's stamp set Giddyup!  This is such a cool kit great for any buckaroo in your life, young or old.  I paired the stamps with Imagine's VersaFine Clair for some amazing, clear bold images....


I had a strip of flannel from an old shirt that looked great in place of ribbon for this card.


I love to use corrugated cardboard on my cards - 
this piece was rescued from the trash at work ;)


Finally I used some die-cuts and this fun staying from Club Scrap to finish off this happy card!

Supplies:

Rubber Stamp Tapestry - Giddyup! Peg Stamps
Imagine - Versa Fine Clair, Tear It! Tape, On Point Glue
Club Scrap - Sentiments
MFT - Dies
Cardstock

Sparkle & Shine

Hello my inky friends!

I hope you're week has been going great so far. Today I wanted to share a few cards using one of Rubber Stamp Tapestry's newest sets - Sparkle & Shine!  I love these stamps because the flowers come in multiple sizes AND there are solids and outline images - perfect blend for all sorts of projects.


My first card I made a grid pattern using a pencil and ruler to place dots where I wanted the flowers to be located. I stamped the solid and outline flowers both using VersaFine Clair Warm Breeze then stamped the leaves with  VFC Verdant.  I sprinkled clear ep over the entire panel and embossed.  I added faux gemstones in multiple colors of blue over top.  The sentiment (clubscrap.com) was stamped on a banner which was affixed to the card with double stick foam tape.


I love this card...it's one of my fav's, so easy but it turned out so pretty.  The flowers were all stamped with VF Clair as were the leaves.  I stamped the sentiment along the bottom then flicked a lavender watercolor paint over the panel.


My final example looks a bit tropical don't you think?  It was a total surprise because it wasn't at all what I was going for.  My original intent was to do something similar to the circle card I made yesterday where the circles were "bouncing" along.  When I started stamping I just got carried away and it ended up like this...that sometimes happens - LOL!! Does that ever happen to you?

So there you go - can you tell I was having fun with it?
Hope you enjoyed them as much as I did making them.
Have a great day friends!!

Supplies:

Rubber Stamp Tapestry - Sparkle & Shine
Imagine - VersaFine Clair; Clear Embossing Powder
ClubScrap.com - Sentiments
Prima- Watercolor
Cardstock
Gemstones


Perfect Layering Circles

This month Rubber Stamp Tapestry ~ the Peg Stamp people ~ have released 6 brand new peg stamp sets plus 5 limited edition sets designed by Lindsay the Frugal Crafter.

Today I wanted to share some cards I made using the Perfect Layering Circles.  I LOVE these stamps!!  I was actually going to try to carve various size circles but RST saved me from trying to do so.  (WHEW!)


I wanted to stamp "lines" using the new VersaFine Clair inks and these stamps were perfect to do so. These circles start out at about 3/8" up to the largest which is just a smidgen under 1". 


In addition to the Perfect Layering Circles, this card also features stamps from the Sparkle & Shine set (more on those tomorrow).  Initially I stamped the circles using Memento Dye inks then stamped over top with the flowers using VersaFine Clair.


The last example is again made using VersaFine Clair inks but this time on a piece of vintage map text. I wanted to show the translucent quality of the inks, even the darker shades.


Supplies
Rubber Stamp Tapestry - Perfect Layering Circles; Sparkle & Shine
Imagine: VersaFine Clair; Memento Dye Ink; Clear Embossing Powder; On Point Glue; Tear It! Tape
ClubScrap.com - Sentiments
MFT - Die
Cardstock
Sequins

A Few More Pegged Christmas Cards!

I am really trying to finish up Christmas cards and get them sent out reasonably close to Christmas...some may not make it but at least it's the thought that counts right?  


For some reason this year I seem to be making more portrait instead of landscape oriented cards this year. Usually it's the other way around.  Anyway, here's one of the landscape cards I made this session...  Don't ya just love those lights?


A poinsettia wreath.


This is such a fun card. The "tree" is actually a pine branch but it was laying on it's side on my desk and I noticed that it looked like a charlie brown tree so I decided the snowman needed his very own tree - LOL!!  It's decorated with a trio of tiny flowers (in red) and a 5 petal flower in gold for the star on top!


I love this card - I might have to go against my policy (of no dups) and make a few more of these...It's very "me".  Anyway, the sentiment is from Joy Clair's Rustic Christmas set...goes perfectly with the peg stamps don't ya think?  I may add more glitter if I make more...need to bump up the sparkle factor - LOL!!

So that's what I've been doing...how about you?
Ready for the big day??

Supplies:

Rubber Stamp Tapestry - Peg Stamps
Imagine - VersaMagic (chalk ink); VersaFine; Memento; On Point Glue (to adhere the glitter)
Club Scrap - Cardstock, Ribbon
Joy Clair - Rustic Christmas Sentiment
Glitter
MFT - Stitched Circle Dies

Farmer Christmas Card

Do you know how hard it is to find a farm themed Christmas card?  I decided that this year I'd make my own using Delicata Inks from Imagine.


I made my very own animal Christmas tree and topped it with a gold star!
I gave each animal a bit of holiday spirit with some glitter, a Santa hat and even some reindeer horns. 


I love how it turned out and hope the recipient does too!

Supplies

Imagine

Delicata � Ruby Red, Emerald Green, Golden Glitz, Dark Brown Shimmer
Radiant Neon Amplify! � White
Sponge Dauber
On Point Glue
Memento Ink � Northern Pine


Other

Stampers Anonymous � Livestock
JoyClair Stamps � Antlers, Hat
My Favorite Things � �Merry Christmas� Sentiment
Rubber Stamp Tapestry � Poinsettia, Holly Leaf
Red Glitter
Cardstock � Cream, Kraft
Card base � Dark Green

Carve December 2017 - Day 6

This is only day 6 on my stamp carving journey and I'm still learning.  I have always wanted a feather tree stamp but I've never found one that I really like. There aren't many out there and the ones that are just don't look like what I picture a feather tree so I decided to carve one of my own.


This is my finished "decorated" feather tree.  I used several peg stamps from Rubber Stamp Tapestry for the decorations and to add to the bottom of my spool stand.  Looks cute huh?  Best thing - I can vary the peg stamps to change up my tree for the various seasons and holidays!!!  How cool is that?


But it wasn't all peaches and cream!  It was really hard trying to figure out how to make the branches of the tree and I had an epic fail.   My first attempt actually went into my circular file so I started over.


This time I did things a bit different and carved out all of the little bits. It was VERY time consuming but I liked how it turned out...almost.


I say almost because I started the spool stand too far down on the rubber and ended up not having enough room to carve the bottom portion of the spool....CRAP!


But I had a thought, I went digging through my circular file and pulled out my first attempt.  I liked the spool from that tree so I hacked it off, did a bit of surgery on my second stamp and ta-da! I now had a feather tree that actually had a decent stand.


And here's my funky little feather tree!
The star was carved from some scrap rubber that I cut away making the tree.

So tickled I figured out how to make it after all.

Are you carving???

Supplies:

Speedball Carving Tool

Stamped Imagines:

Imagine - Delicata Golden Glitz; Memento Dye Inks
Rubber Stamp Tapestry - Various Christmas Stamps


Christmas is in the Air

Over the long weekend I decided to take some time and make a few Christmas cards so I pulled out my peg stamps and played a bit.


For my first card I used the set Twinkle Twinkle - I stamped the shape of a Christmas tree with the cedar stamp using Pistashio Memento Ink; next I added the lights and wires using VersaFine Onyx ink and finished it off with the ornaments.  I also used a couple stamps not included in the kit - the little sitting mouse and Merry Christmas sentiment.  I added the light halo using a sponge dauber with matching ink.  I wish you could see it IRL because then you would also see that the lights are a bit sparklie from the touch of Sparkle irRESISTible Medium I covered them with.  

The card background was stamped using snowflakes (White VersaColor ink) and a trio of tiny flowers (in Delicata Golden Glitz).


This is my "country Christmas" card...  I used Southern Pine set around the top and bottom edges. The sentiment is from Just From Fun stamps.  It's a bit rustic looking which I thought goes perfectly with the pine cones.


Finally I did something a bit different with the Holiday Joy stamp set. I used the leaves, flowers and squiggles combined them with the poinsettia stamp from Pine & Poinsettia set to make my own "poinsettia tree".  The barrel stamp is something I had in my stash (sorry, don't recall which set it's from). 

The background for this card was stamped with candy canes, stockings and a tiny little gift which is just darling! 

This card is a bit different for me as it leaves traditional holiday colors behind and I used Love Letter which has a rose hue, Bahama Blue and Bamboo Leaves green.  Not exactly what you think of for Christmas but I think it works.

Anyway, that was my bit of stress relief over the long holiday weekend ;)

Cactus...Desert or Terrarium???

Ha...it's a trick question - it's both!  These are a couple of the new stamp sets at Rubber Stamp Tapestry, a.k.a. Peg Stamps - Desert Cactus & Cactus Terrarium. Since these stamps coordinate so nicely I used stamps from both sets to make each card.


My first card I wanted to make a "desert" so I stamped and masked and stamped some more. I then colored everything using some sponge daubers and a variety of inks...Memento, VersaMagic, and Delicata to really bring it all to life.   You might notice a couple extra twigs, sprigs and flowers here and there. Those are also peg stamps from my collection.


And this card is my "terrarium" card.  Again a mix of stamping and masking with a few flowers, grasses and twigs mixed in.  It was then die-cut and popped off the card with double stick foam tape.


My final cactus card for the day was actually stamped on a left-over diecut I had laying on my table.  I was actually looking at different colors of green, stamped one then it looked kind of cool so I kept going. I wasn't sure if that bright green would work but it turned out o.k. I even had some gemstones to match!  The addition of the flowers and other bits really brought it all together don't you think?

So you see you don't really have to choose
you can have both -
Desert and Terrarium!

Supplies:

Rubber Stamp Tapestry - Peg Stamps - Desert Cactus, Cactus Terrarium
Imagine - Memento Dye Inks, Kaliedacolor - greens, VersaMagic, Delicata, Sponge Daubers
ClubScrap.com - Cardstock, ribbon
MFT - Dies
Gemstones

Build a Prickly Pear

Today I wanted to share some cards I made using the Build a Prickly Pear Cactus set from Rubber Stamp Tapestry...


I had fun with this card - stamped the cactus & weeds then watercolored all around. It was fun to work with the layers of color to get this look. 


Just because I could - LOL!!


This is my attempt at CAS cacti - I started off with just the cactus, then I had to add the branches and it still looked too bare so I added the flowers & sentiment....  Still not enough so I flicked on some blue watercolor speckles...  Still didn't look good then I added just a few black pen strokes on the sentiment and I was finally satisfied with it!  What do you think?

Supplies:

Rubber Stamp Tapestry - Build A Prickly Pear
Imagine - Memento Dye Ink; VersaMagic Ink, Kaleidacolor
Kuretake Gansai Tambi Watercolor Paint
Washi Tape