Showing posts with label mixed media. Show all posts

Project Swap Part 2

Yesterday in part 1 of Project Swap I shared the card I made following Nadine's written instructions to see how closely the reproduction would be to the original.  Today in Part 2 of Project Swap I wanted to show you the project I made and show you how Nadine's project turned out!


I wanted to create a piece of art that I had originally planned on hanging in my kitchen but as it turned out it looked better in my bathroom.  The artwork is mounted on a 12x12 black canvas and really pops IRL.

Now I won't show you what Nadine created here...you'll need to jump on over to the blog and you'll be treated to a video of how she re-created my project!!


I hope you enjoy the project video, it's really fun to watch her walk through the entire process!  I hope we can do this again sometime.

Bottle Cap Art Doll

I have another inspiring creation for the Lost Coast Design & Carmen's Veranda challenge - Stamped Backgrounds!


Isn't she great?
Hope on over to the LCD/CV Blog to check out how she was made...


Image may contain: text

Don't forget, today is the last day to enter the Stamped Background challenge!!
You don't want to miss out on your chance for free stamps.

Succulents

Hello friends...I hope you're having an inky day!

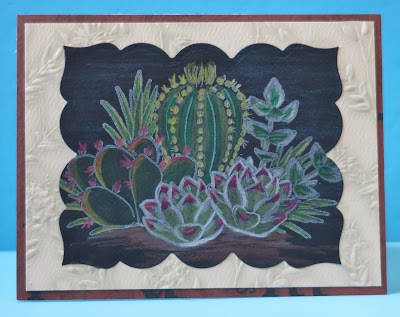
Today I have 3 totally different projects featuring one stamp set - Succulents by Rubber Stamp Tapestry.


My first project uses a canvas I made using yesterdays technique of pairing pigment powders ~ in this case Lindy's Magical Shakers ~ with white glue.  The succulents were masked & stamped then colored with Chameleon Markers and fussy cut.


My next project is this fun "congrats" card I made using the hen from the set.  I stamped the succulent with VersaFine Clair Nocturne (black) then stamped a circle of color over each image (Verdant and Chianti VFC).  I added the little dots using a peg stamp then added the die-cut sentiment.


I had lots of fun with the final card.  I stamped/masked the succulents with white ink on black cardstock. I then colored the succulents with a fun set of colored pencils from Crayola designed to work on dark cardstock.  There are so very pretty metallics and shimmery colors in this set.  I was totally surprised, it is NOT what I was expecting from Crayola but boy did these pencils deliver.  

As luck would have it this months challenge at House of Cards is to use colored pencils on dark cardstock!  I'm happy to enter this card into their challenge.


Image result for design hues pencils

Supplies:

Rubber Stamp Tapestry - Succulents
Imagine - VersaFine Clair, Memento Luxe
Lindy's Magical Shakers
Crayola - Colored Pencils
Club Scrap - Cardstock
Canvas
White Glue
MFT - Die-Cuts

Pigment Powder Glue Art

Today I wanted to share a fun idea...combining your pigment powders with glue.    I did this quite some time ago and paired the pigment powders with a clear gloss glue but decided to give my new Lindy's Magical Shakers a try with plain old white glue on canvas and here's how it turned out....


These turned out so pretty...I wish you could see the shimmer from the pigment powders IRL...they sparkle and shimmer like you wouldn't believe.


All I did was spread a layer of white glue over the canvas then sprinkle on the powders.  I left it to dry and the results are what you see.


I wasn't to show you the amazing texture of the surface of the canvas...it's really cool looking...


The speckles that show up really well in this photo are the bright shimmer of the powders...some areas the color is more prevalent, other places it's the shimmer.  Just such a nifty result.


This is another canvas I did but I misted the top of the glue with water before sprinkling on the powders.  I also took a tool and made circles in the glue right after I sprinkled the powder on.  You can see that (because of the water) the colors traveled more freely but the glue did hold some of the swirly designs.  

I think this is going to be a really fun technique to explore more in the future, more ideas rolling around that I want to try.

Steampunk Inventor Gothic Arch

Last Sunday was Thomas Edison's birthday...he was and in my mind will probably always be one of the great inventors of our time.  In honor of his birthday they named February 11th National Inventors Day and I made this fun Gothic Arch to celebrate them both!


There's a little bit of everything on the arch...vintage ephemera, stamping, die-cuts, Vintage Creative Medium (my favorite), Metallic Creative Medium (Bronze, Silver, Gold and Copper); lots of embossing powders on the Gothic Arch base (red, copper and patina) as well as the fun vintage images.  I love when I can mash 'em all together to make something like this.

If you'd like step by step instructions 
and a complete list of supplies you can find it here -